Turn Purchases, Sign-ups and Surveys from Google Forms into Social Proof
Webhooks are a way in which apps send information to other apps. You can now use webhooks with Google Forms to connect your data with Nudgify.
In Nudgify, we have a Smart Webhooks feature which makes it extra easy to send information from other apps to Nudgify. You can then show this information in Purchase Nudges, Sign-ups Nudges, or Review Nudges.
To read about our Smart Webhooks, you can click here.
Connecting Smart Webhooks to Google Forms.
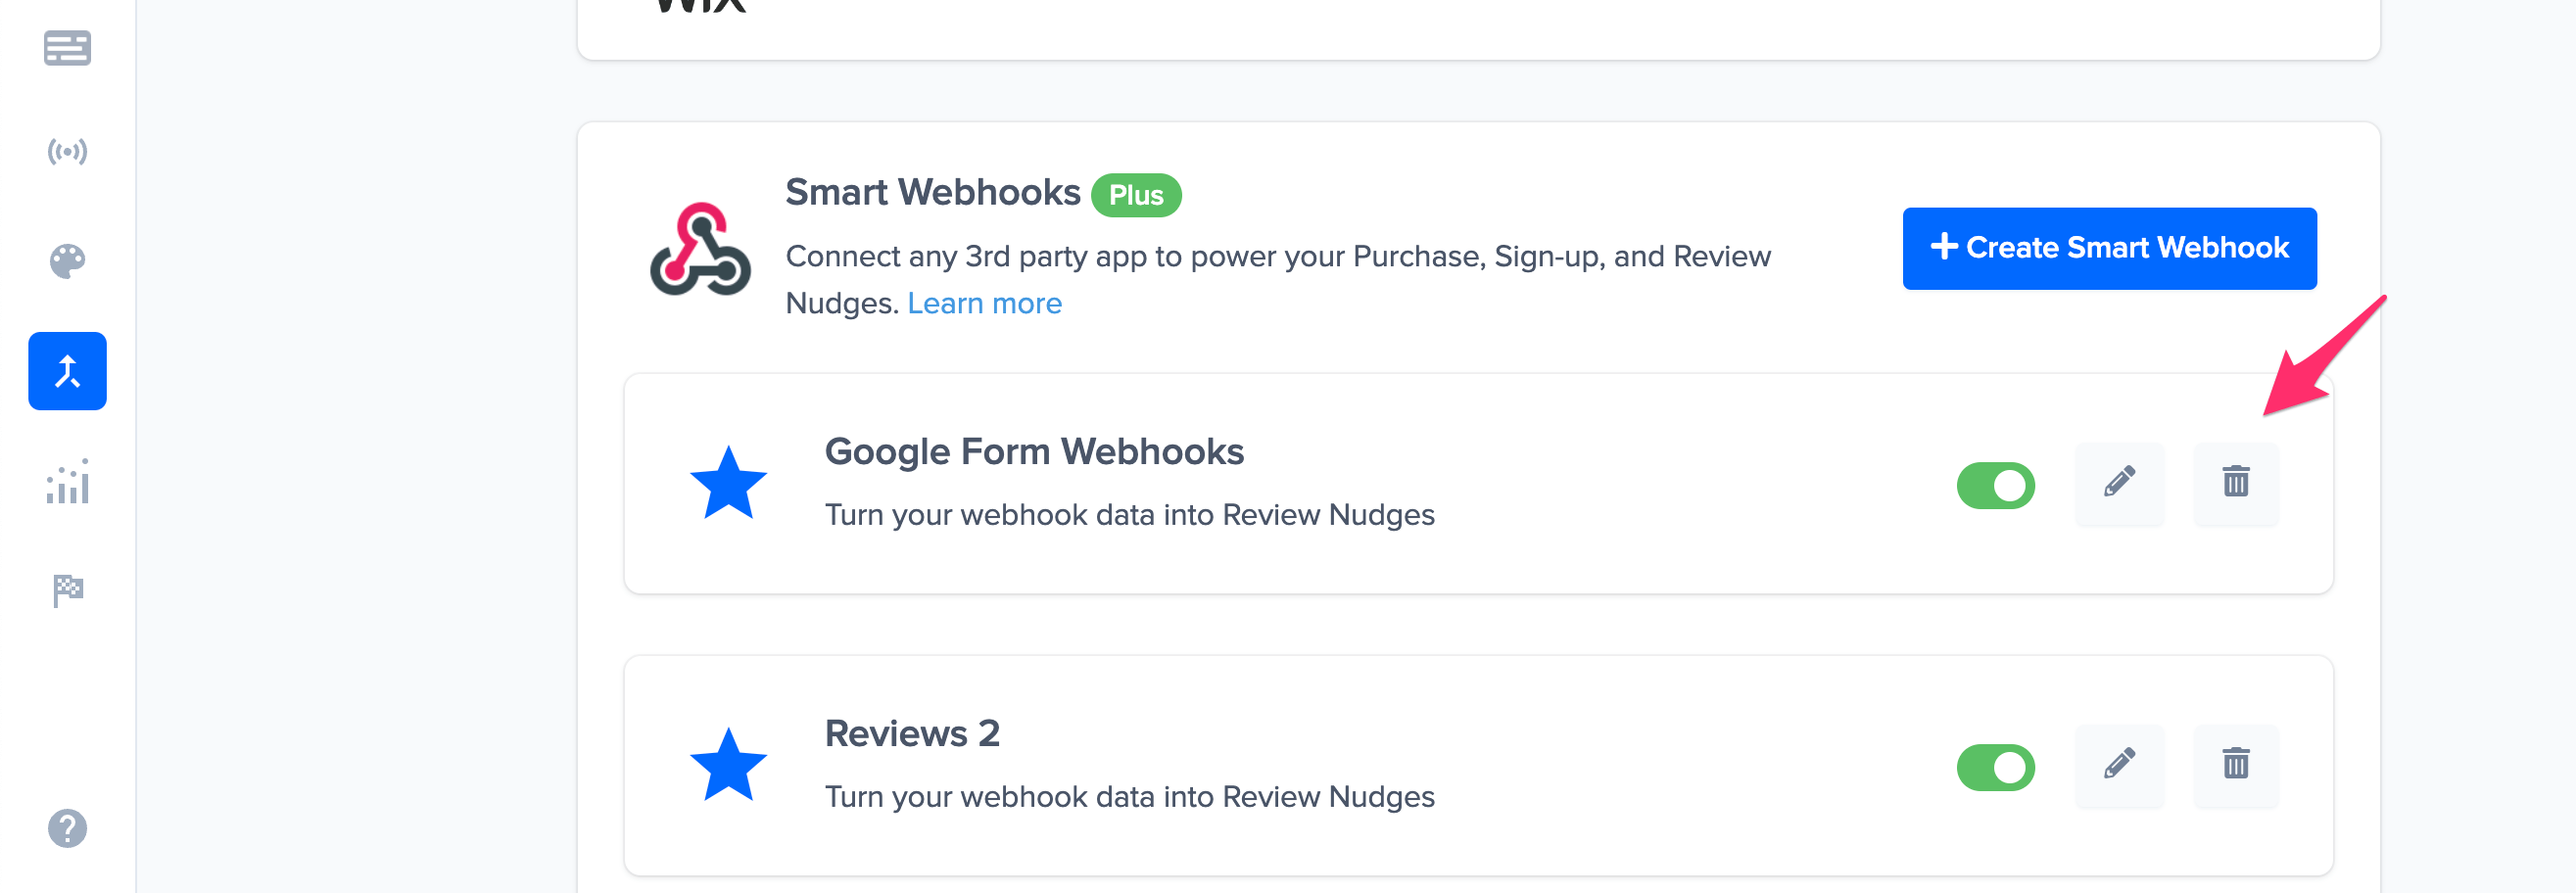
To create a new Smart Webhook, navigate to the Integrations tab via the left-side menu. Scroll down and click on “Create Smart Webhook”.
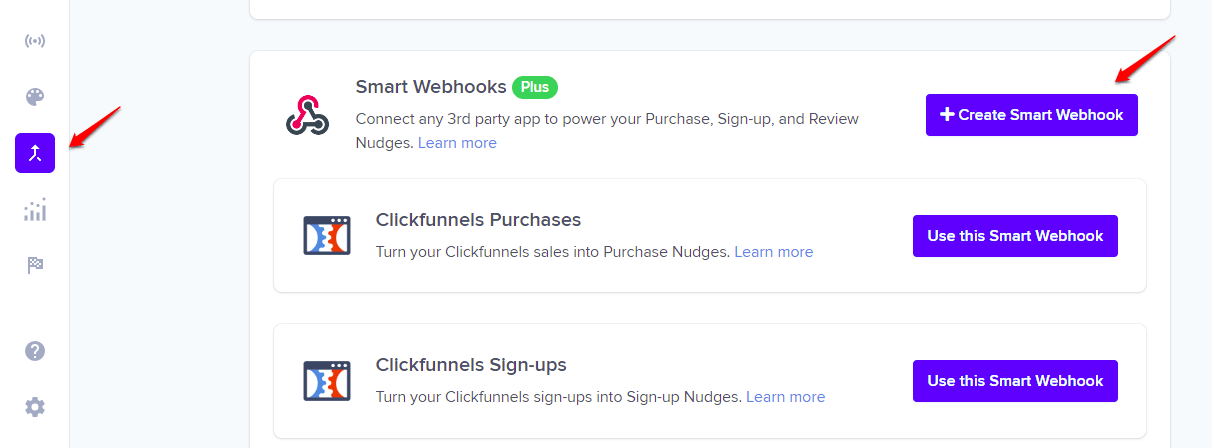
Just click the “Create Smart Webhook” button, and follow steps 1-7 below.
Step 1: Select the data type
Select the data type you’d like to connect. Is it data you want to show in Purchase Nudges, Sign-up Nudges, or Review Nudges?

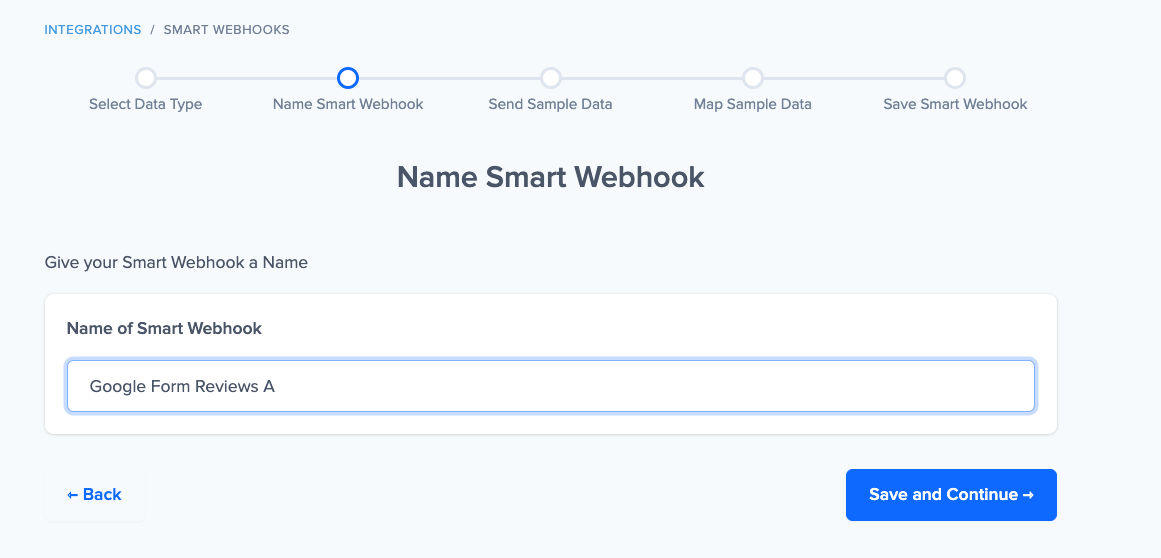
Step 2: Name your Smart Webhook
Give your Smart Webhook a name. We recommend naming it after the app that you are connecting, e.g. “Google Form Sign Ups”.
Step 3: Copy and paste your Webhook URL
You now see the unique Webhook URL for the Smart Webhook you’re creating. You can compare this Nudgify Webhook URL to a “phone number”, something that you’ll need to give to the app you want to connect to Nudgify. This way, your other app will know to send the updates (e.g. new orders, sign-ups, etc) to Nudgify. You need to copy this Webhook URL and paste it into the right place in the app you want to connect to Nudgify.
Where exactly you need to paste your Webhook URL is different for each app you want to connect.
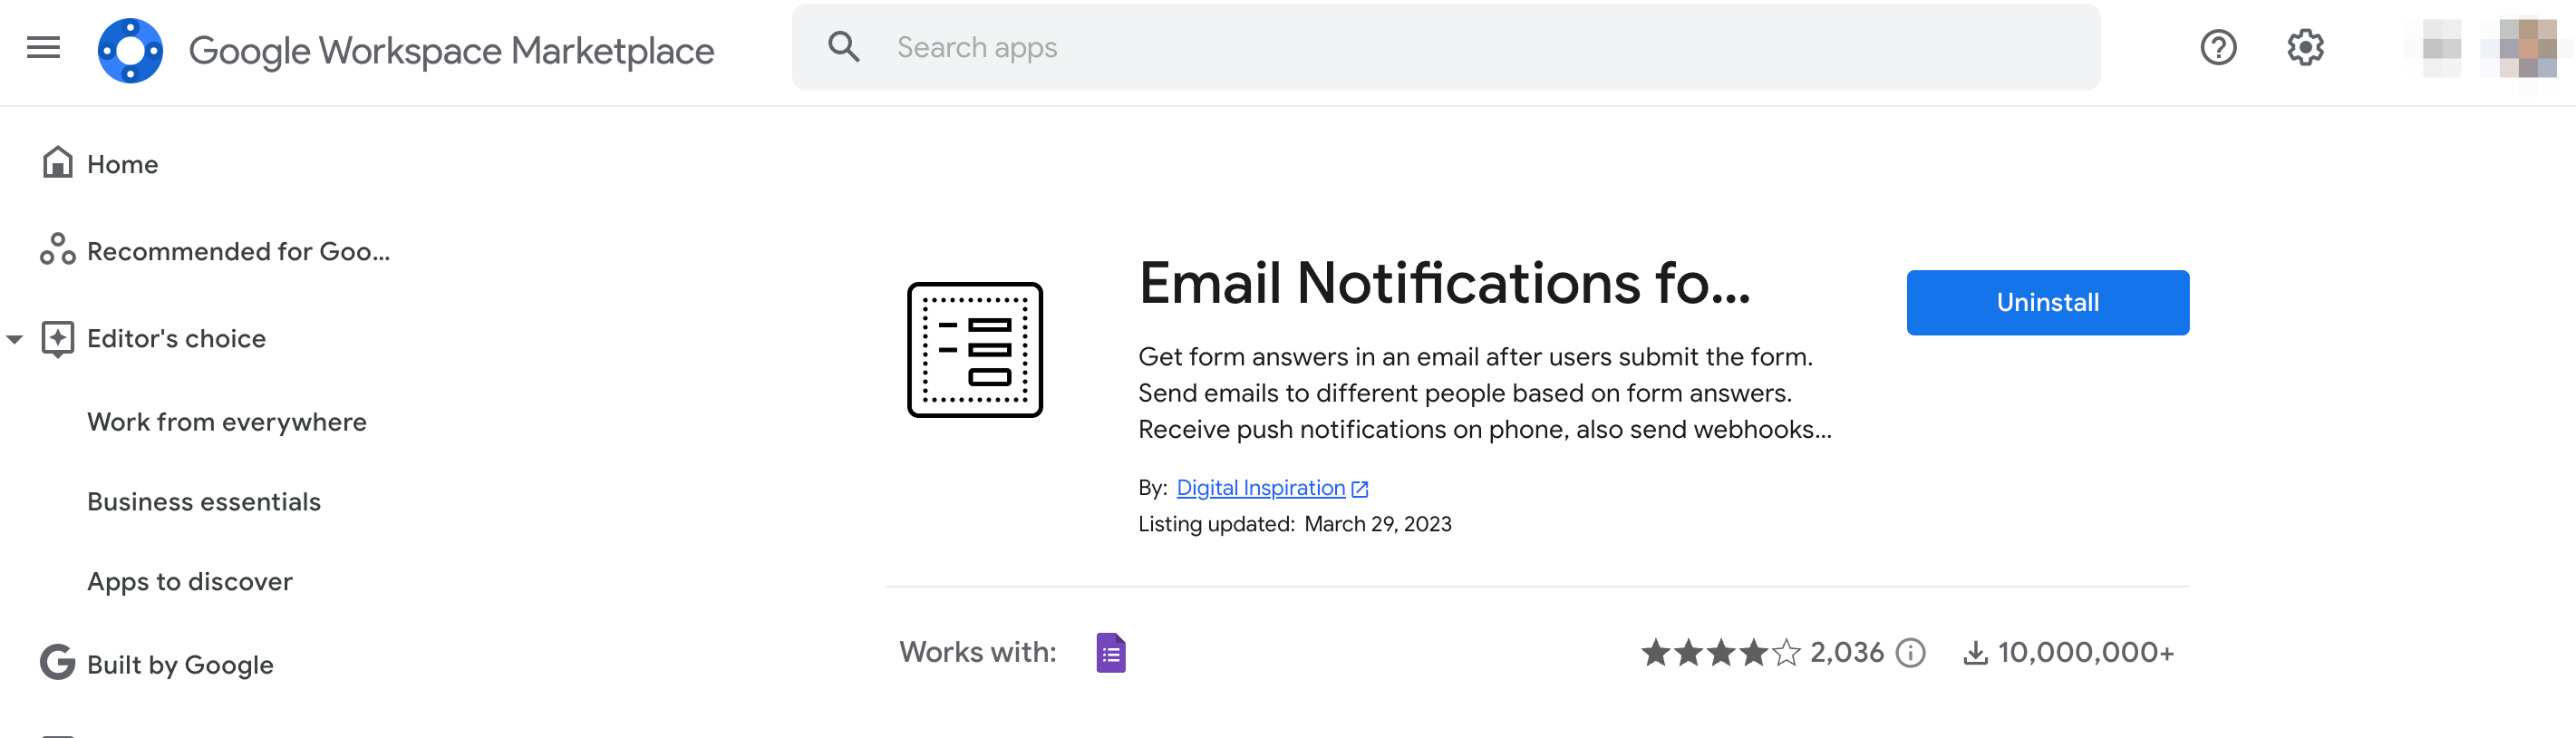
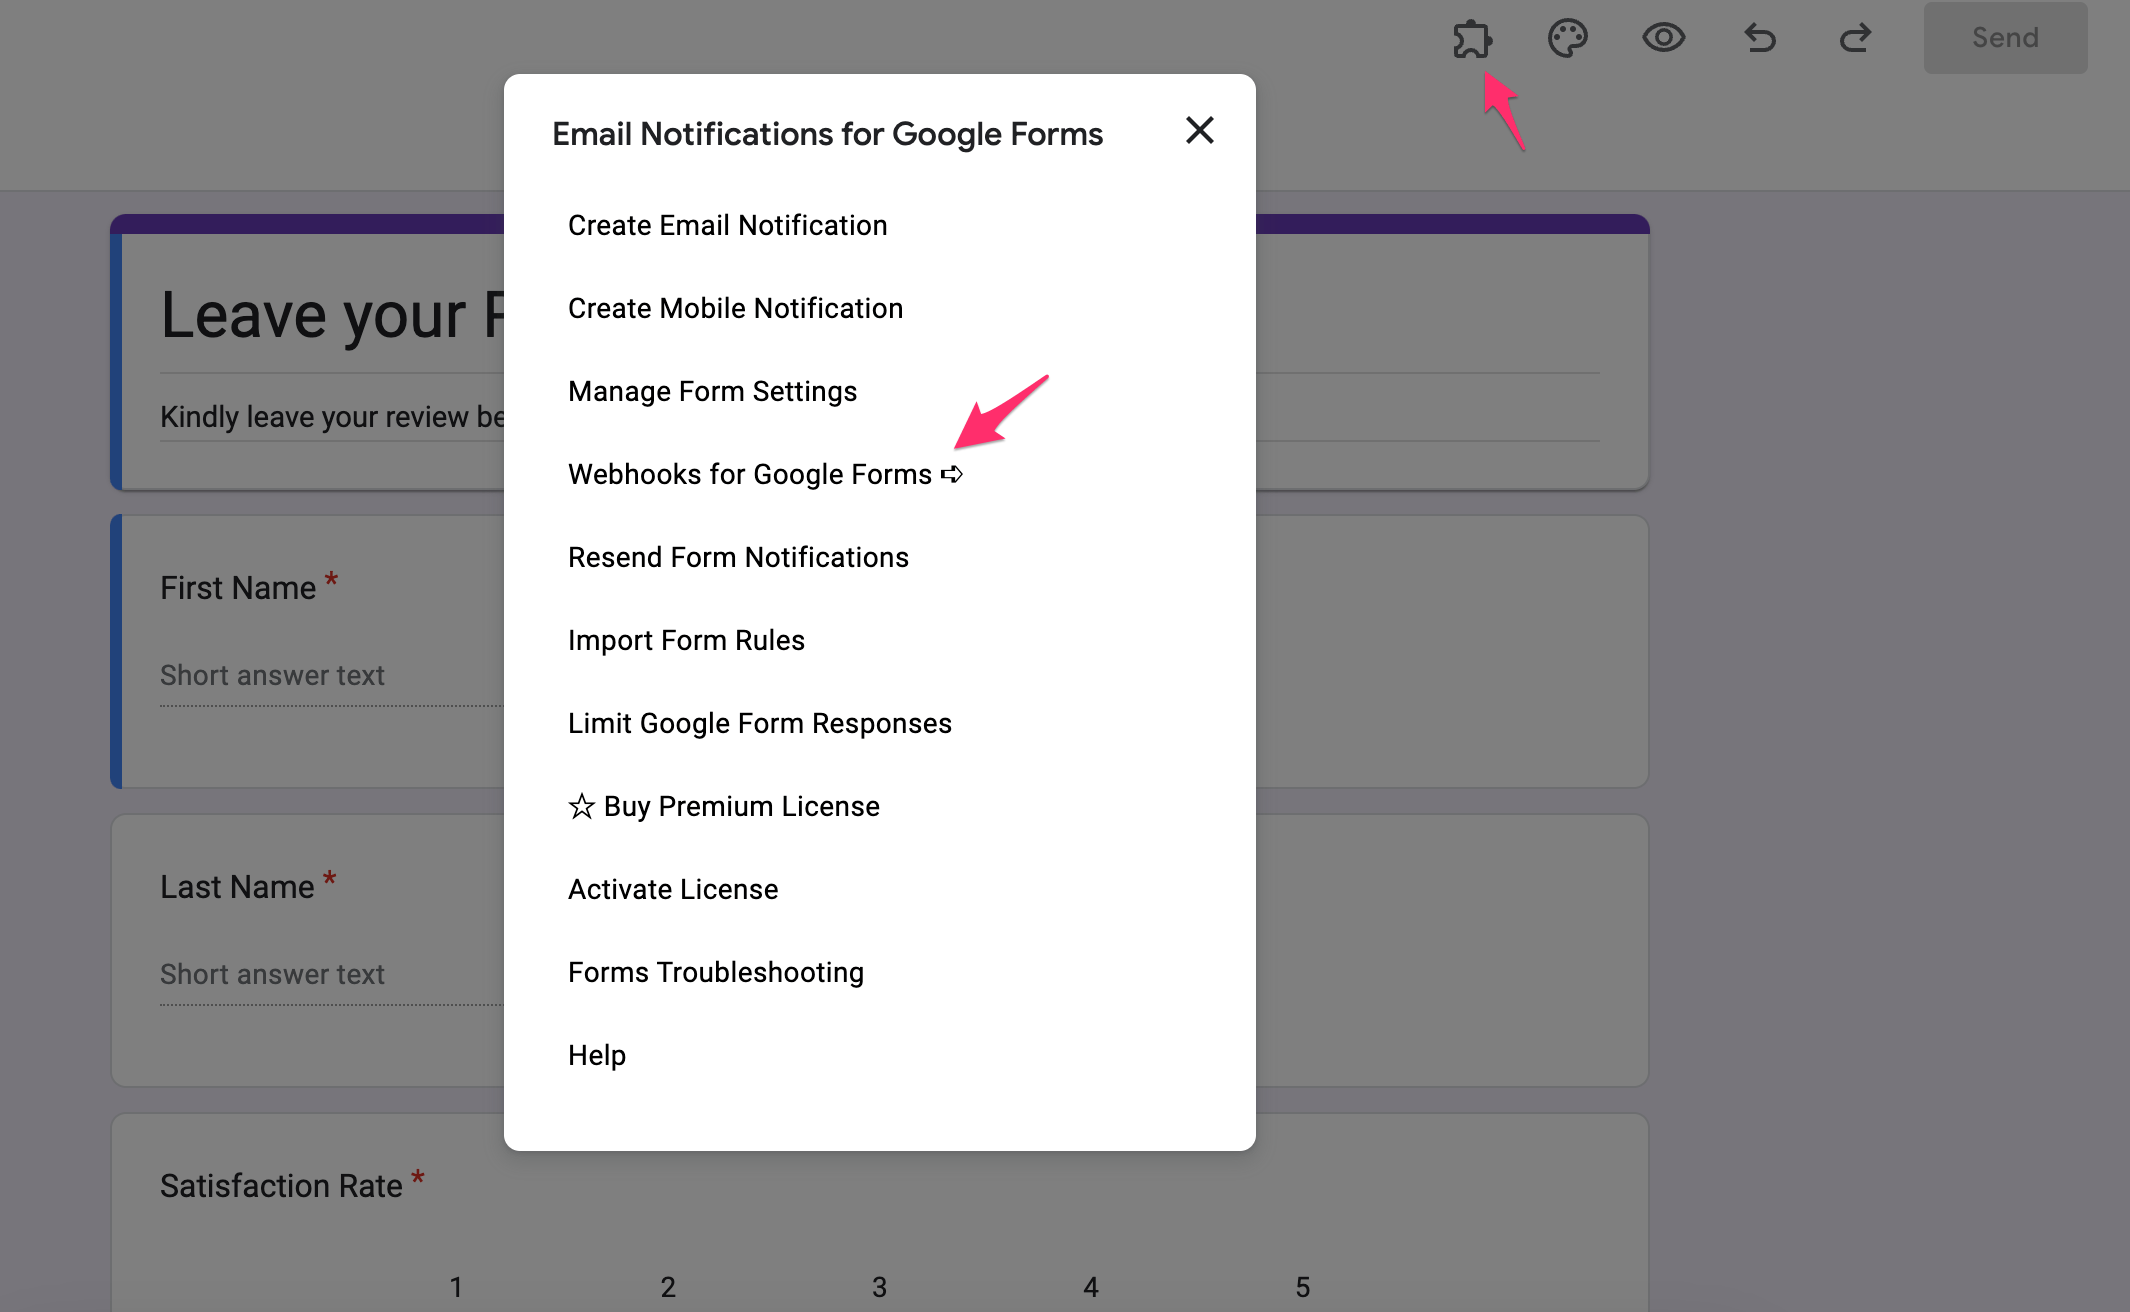
To add the plugin that supports webhooks to your Google Forms, you need to go to Google Workspace Marketplace and add the Email Notifications add-on. Once that is installed, you can proceed to the Google Form you want to push to Nudgify and click on the Add On button. Select the Add-On button.
Select “Webhooks for Google Forms” from the options provided.
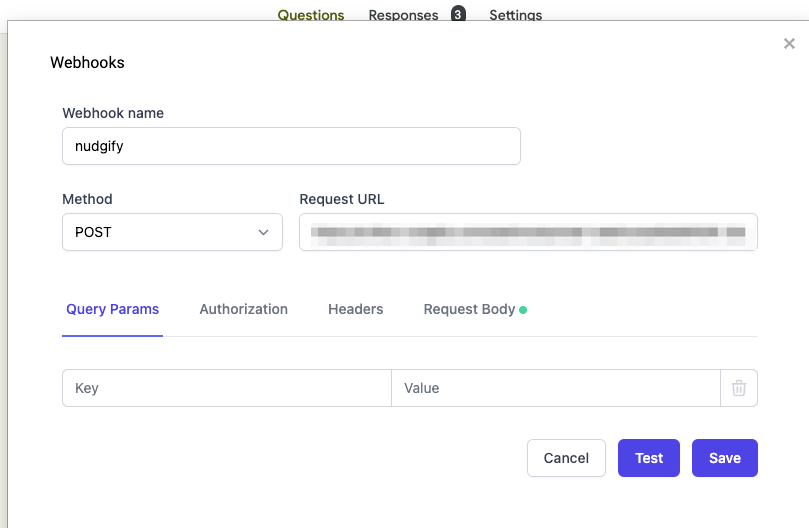
Then click create your webhook and name it.

Paste the Nudgify webhook URL listed at the beginning of step 3.
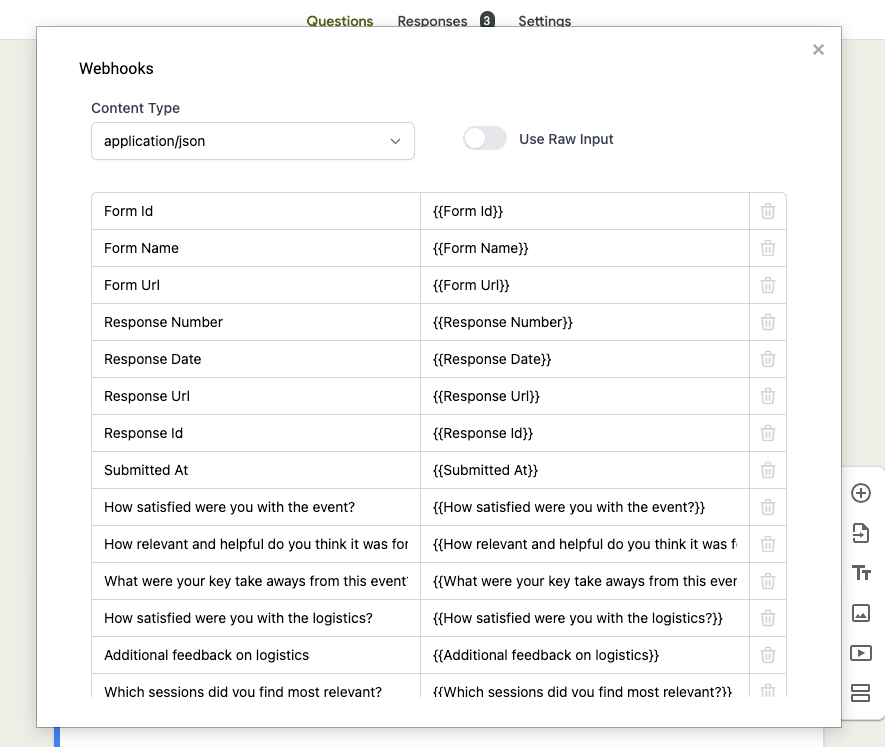
Remember to map all the fields correctly in the tab labeled “Request Body” so that the data can be mapped properly to Nudgify.
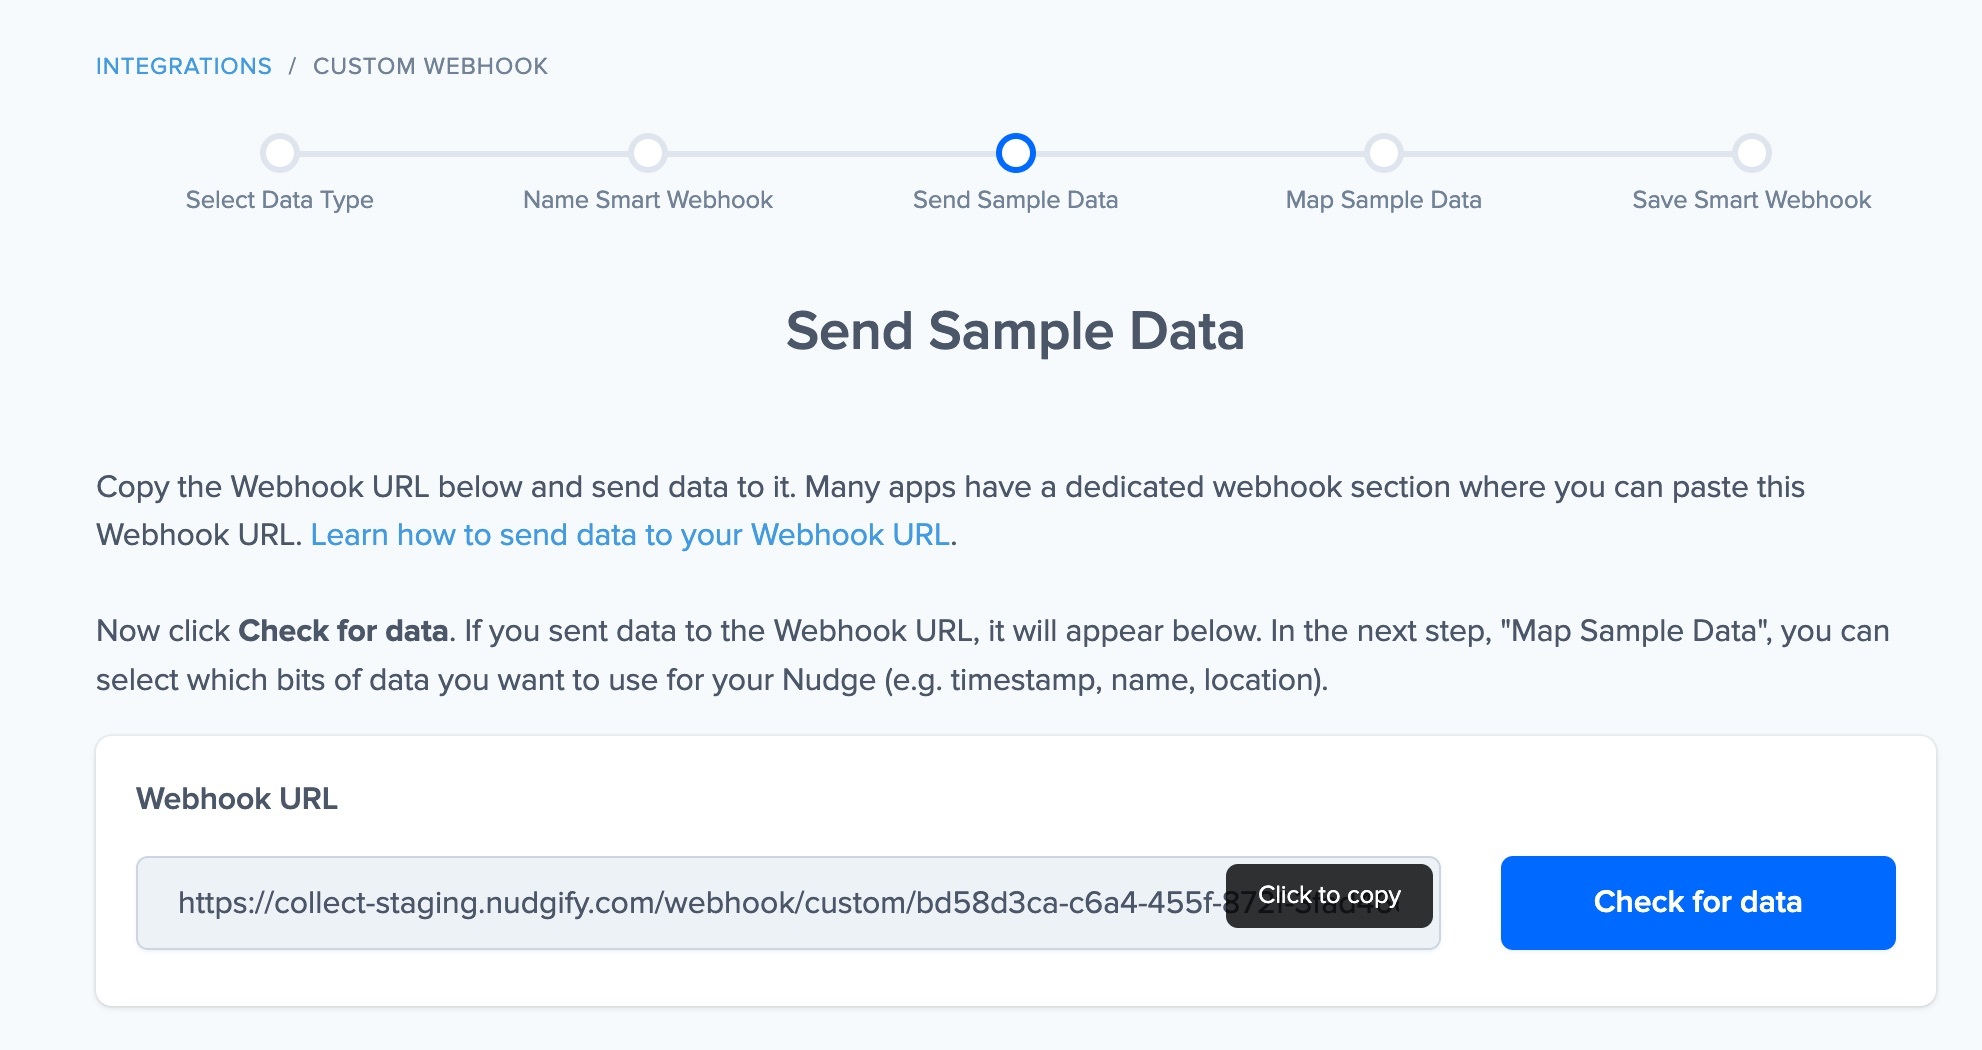
Step 4: Send sample data to your Webhook
Now that your Smart Webhook URL has been saved, your app has Nudgify’s “phone number” and knows what type of updates Nudgify is interested in.
Now, it’s time to send a test update to Nudgify via the webhook and see what information comes through in the update. This is an important step in the process of setting up your Smart Webhook because it lets you “map” which information you want to show in the Nudge.
Depending on the type of event it is (a new order, a sign-up, a review), different data can come through via the webhook, such as the name of the customer, the name of the product they purchased, the number of stars in the review, etc.
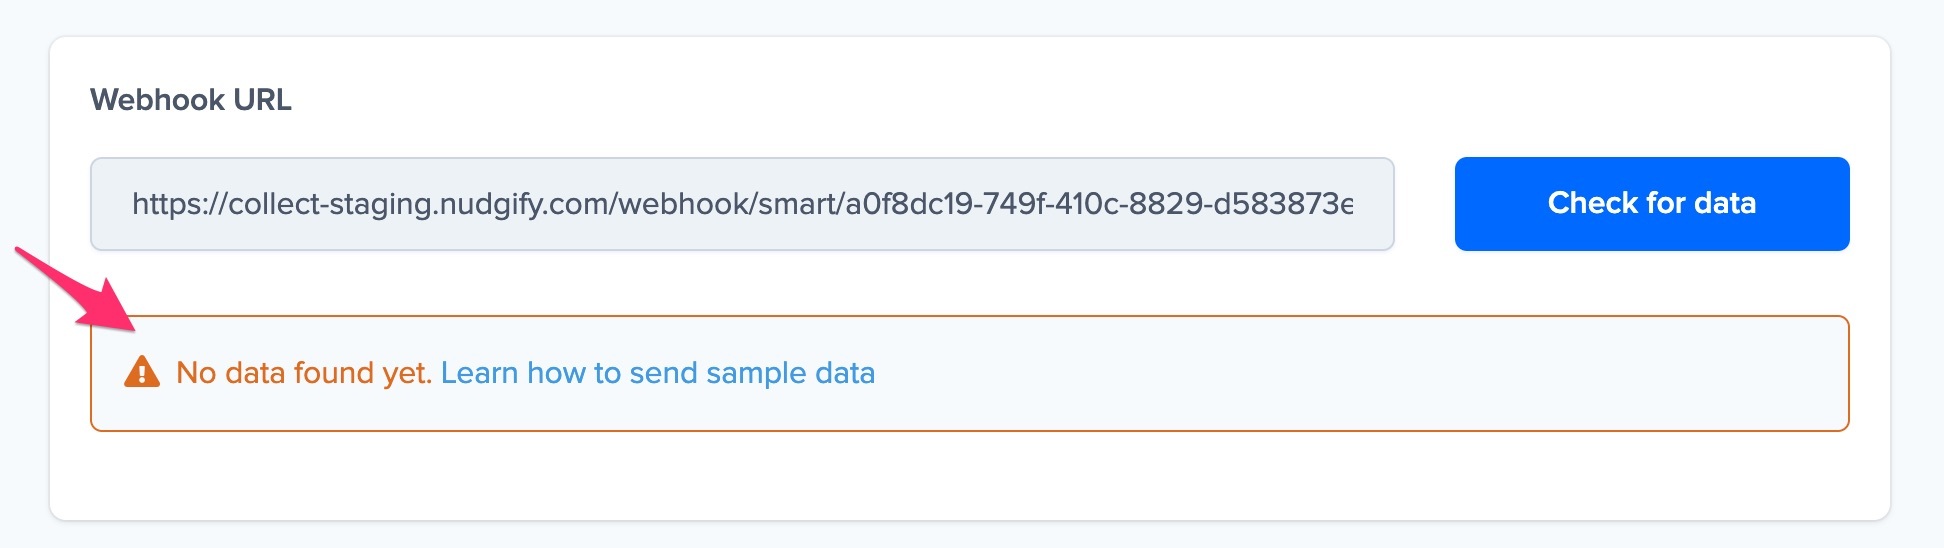
You can send sample data to your webhook by triggering the event that you selected for your webhook. If this is a form submission, to a test submission of your form. If this is a new purchase, place a test order. Once you’ve triggered this event, click the Check for data button in Nudgify. If you’ve indeed triggered the right event, the update including the relevant information was sent to your Smart Webhook in Nudgify and the data will appear below your Webhook URL.

If no data was found, this means that you haven’t triggered the right event, or you have not set up the Webhook URL for that event. You can double-check and adjust your set-up, and then click Check for data again.
Step 5: Map your sample data
In this step, you tell Nudgify which pieces of data to use in your Nudge. Which bit of sample data is the customer name? Which bit is the name of the product they purchased? And so on. You use the drop-downs to select the right bit of sample data for each field.
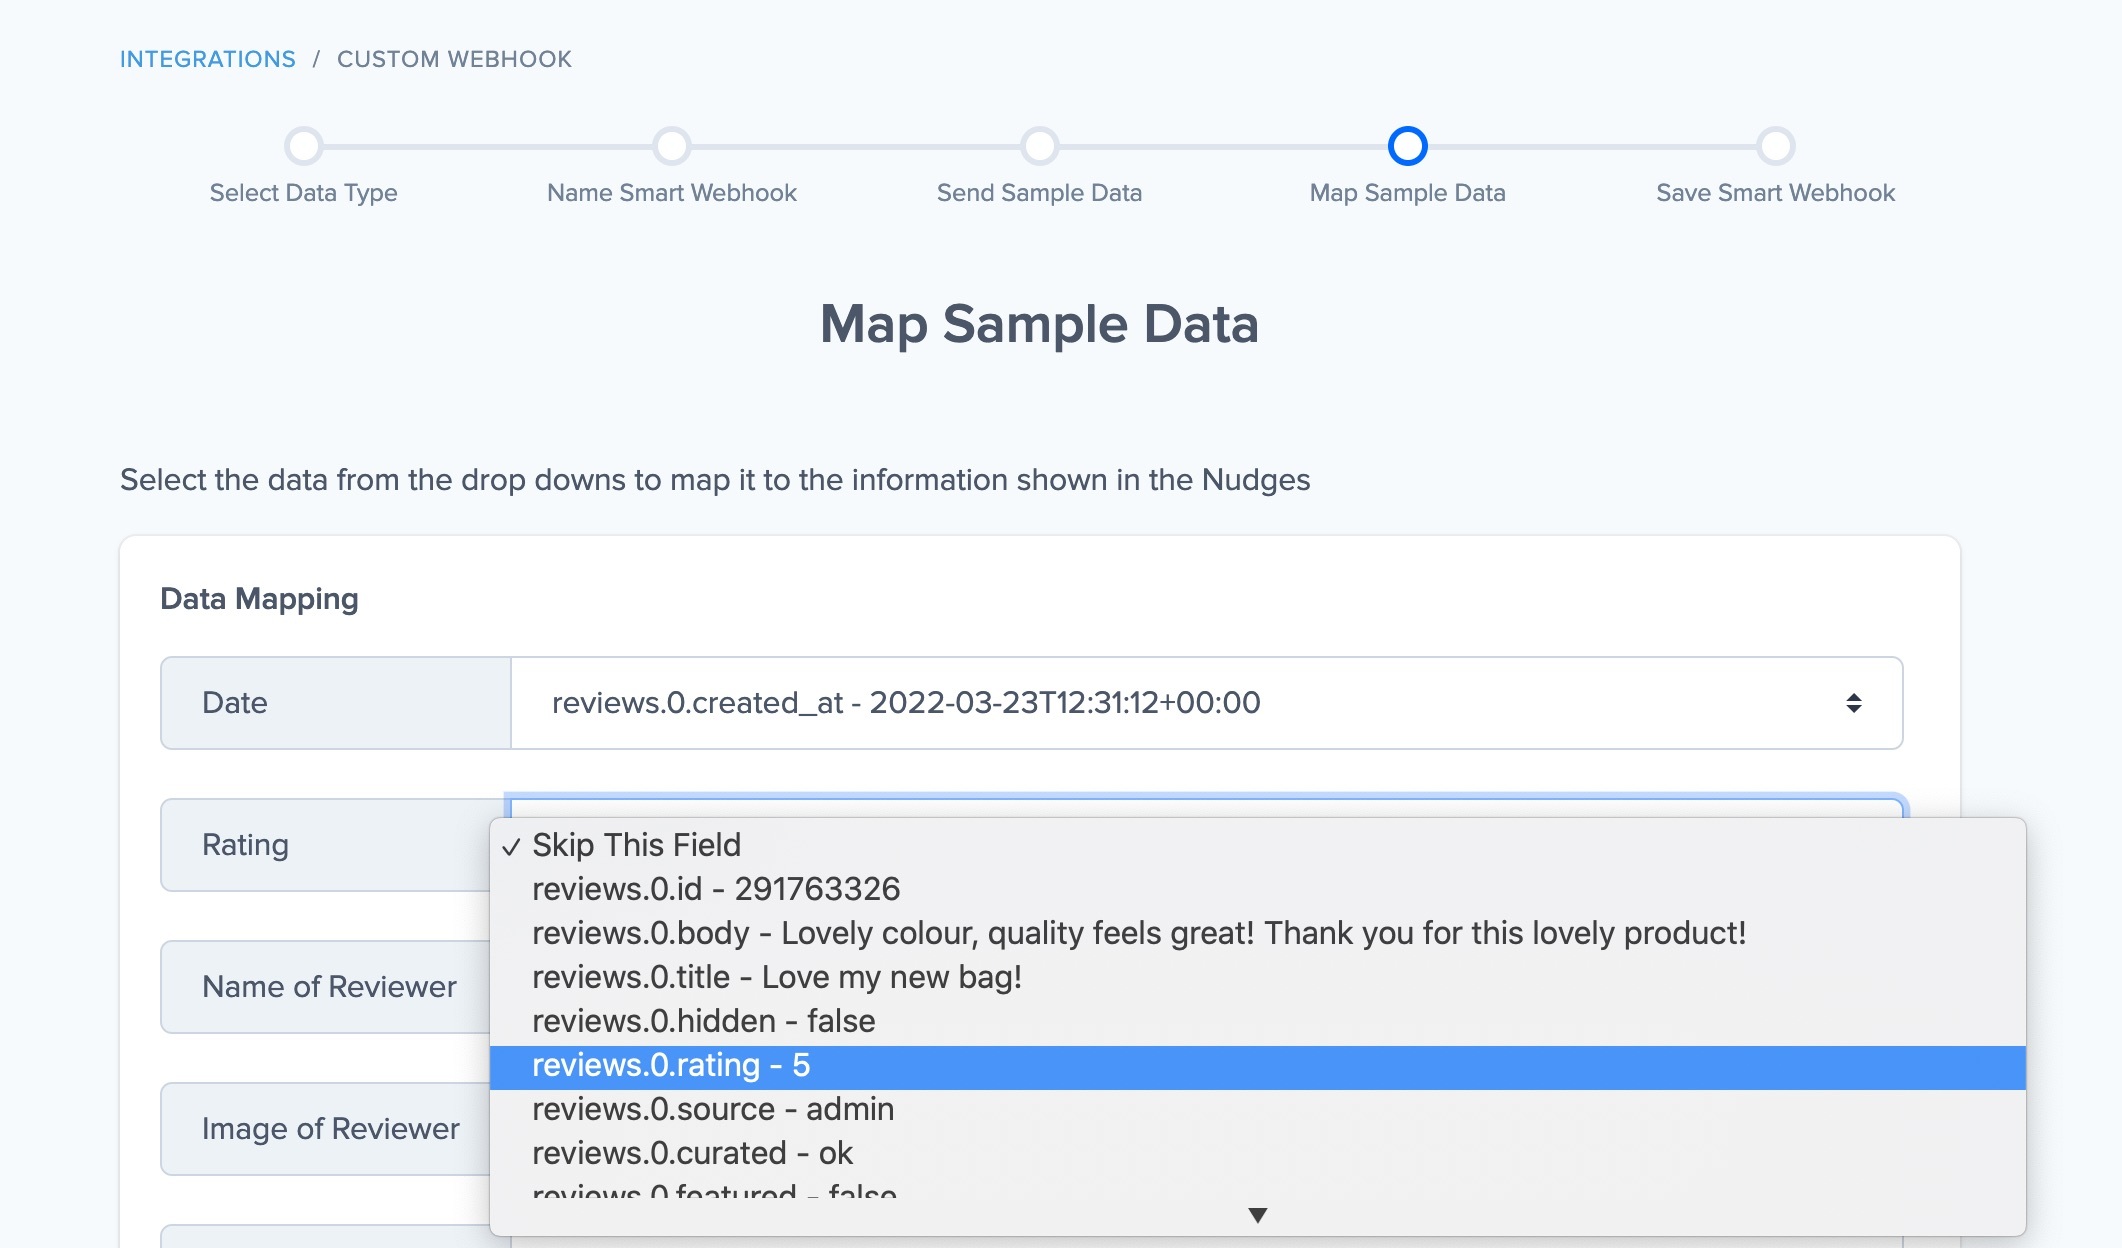
Mapping the data is something you do one time. Once you have “mapped” the sample data for your Smart Webhook, any new purchases/sign-ups/reviews that this webhook sends to Nudgify will show the correct bits of data in the correct places of the Nudge.
Note: Nudges can only display data that is sent by the third-party app you connect via the webhook. If the app you connect does not provide e.g. the location of the customer, then Nudgify won’t be able to display the location in a Nudge.
Step 6: Save your Smart Webhook
In this last step, you see an overview of your Smart Webhook: the name of your Smart Webhook, its data type, the Webhook URL, and your data mapping.
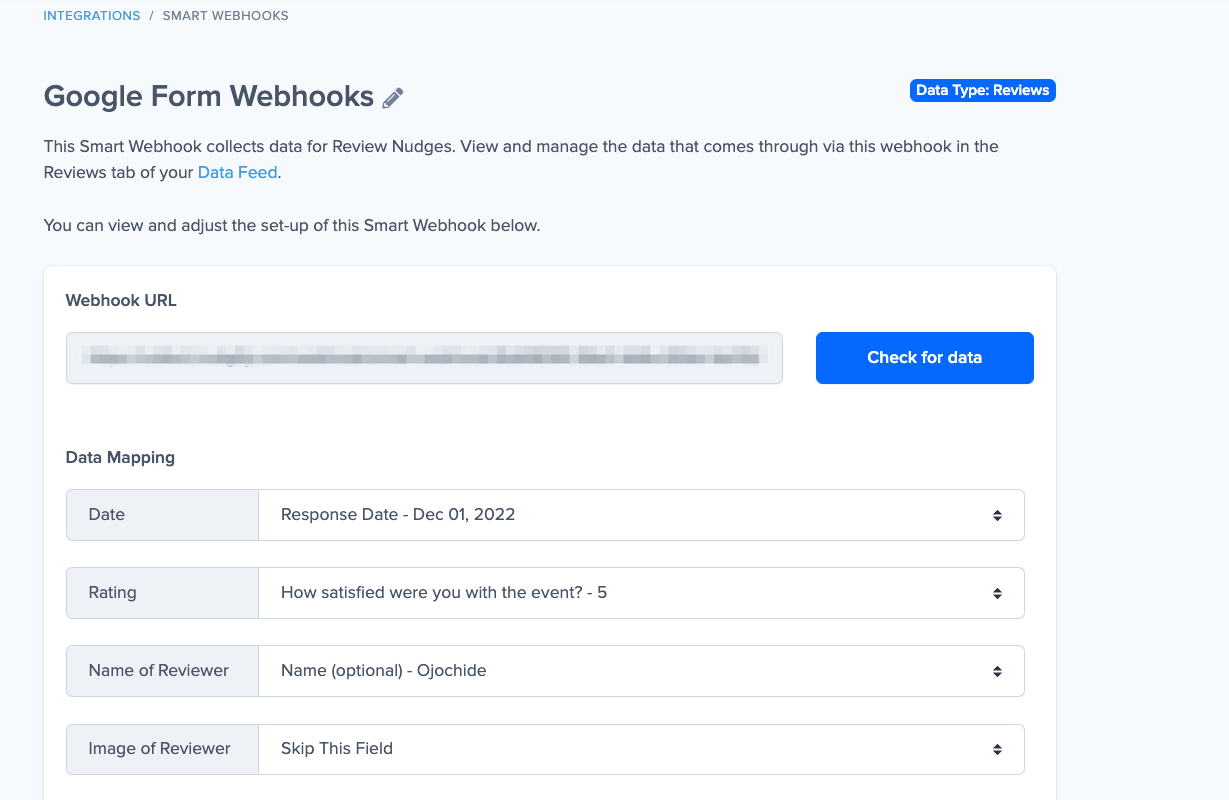
To save your webhook, click “Save”. You can always return to this overview and make changes to the set-up of this Smart Webhook by clicking the pencil icon on the Smart Webhooks page.
That’s it! You’ve created your Smart Webhook!
Step 7: Show your Smart Webhooks data in Social Proof Nudges
Congratulations, you have created a Smart Webhook! On your Data Feeds page, you can see the data that is connected to Nudgify via your Smart Webhook in the relevant Data Feed tab (Purchases, Sign-ups, or Reviews).
You can now display this data in Purchase, Sign-up, and Review Nudges respectively, by selecting your Smart Webhook as the data source when you set up the Nudge. For example, if you created a Smart Webhook for Purchases, this Smart Webhook now appears in the dropdown among the Data Sources you can select for this Nudge.

When you select it as the data source, the Nudge will display the data that comes through to Nudgify via your Smart Webhook.
What if not all the bits of data are there?
Smart Webhooks allow you to connect any third-party app that also supports webhooks. Every app will handle webhooks slightly differently and send different bits of data along with the webhook. For example, some apps might send the First Name and Last Name of the person who signed up, other apps might send the Full Name. Some apps might not send a name at all.
As a general rule, Nudgify is not able to show any data that is not there. So if the third-party app does not send the customer name along via the webhook, then we are unfortunately not able to display the customer name in the Nudge. Below, you find an overview of the impact of different bits of data are missing:
Data Type: Purchases
| Data field | Description | Impact if missing |
|---|---|---|
| Date | The date we use to show in the Nudge how long ago the purchase took place | We use the moment the order came through to Nudgify via the webhook as the "fallback" date |
| The email address of the user to identify that there has been a new purchase | Required! We use the email address as identifier. Without the email, we can't show the purchase in Nudges | |
| Order ID | The order-id we use to identify which items are part of the same order | Required! Without the Order ID, we can't show the purchase in Nudges |
| First Name | The first name of the customer, to show in the Nudge | We do not display the customer name in the Nudge, unless you use the "Full Name" field |
| Last Name | The last name of the customer, to show in the Nudge (we only show the initial of the last name) | We do not display the customer name in the Nudge, unless you use the Full Name field |
| Full Name | The name of the customer, to show in the Nudge | We do not display the customer name in the Nudge, unless you use the First + Last Name fields |
| City | The city of the customer, which we show in the Nudge | We do not display the City in the Nudge, unless you use the IP Address field |
| State | The state of the customer, which we show in the Nudge (for US) | We do not display the State in the Nudge, unless you use the IP Address field |
| Country | The country of the customer, which we show in the Nudge (note for the US we use State instead) | We do not display the Country in the Nudge, unless you use the IP Address field |
| IP Address | The ip address of the customer, to show the location in case City/State/Country are not available | We do not display the customer's location in the Nudge, unless you use the City/State/Country fields |
| Product ID | The id we use to identify the product that was ordered | We do not display any product information |
| Product Variation ID | The id we use to identify the variation (colour, size etc.) of the product that was ordered | We do not take into account different variants of the product |
| Product Name | The name of the product that was ordered, to show in the Nudge | We do not display the product name in the Nudge |
| Product Page Link | The product page that we link to from the item name in the Nudge | We do not link to the product page from the product name in the Nudge |
| Product Image URL | The product image that we show in the Nudge | We do not display the product image in the Nudge |
Data Type: Sign-ups
| Data field | Description | Impact if missing |
|---|---|---|
| Date | The date we use to show in the Nudge how long ago the sign-up took place | We use the moment the sign-up came through to Nudgify via the webhook as the "fallback" date |
| The email address of the user to identify that there has been a new sign-up | Required! We use the email address as identifier. Without the email, we can't show the sign-ups in Nudges | |
| First Name | The first name of the user, to show in the Nudge | We do not display the user's name in the Nudge, unless you use the "Full Name" field |
| Last Name | The last name of the user, to show in the Nudge (we only show the initial of the last name) | We do not display the user's name in the Nudge, unless you use the Full Name field |
| Full Name | The name of the user, to show in the Nudge | We do not display the user's name in the Nudge, unless you use the First + Last Name fields |
| City | The city of the user, which we show in the Nudge | We do not display the City in the Nudge, unless you use the IP Address field |
| State | The state of the user, which we show in the Nudge (for US) | We do not display the State in the Nudge, unless you use the IP Address field |
| Country | The country of the user, which we show in the Nudge (note for the US we use State instead) | We do not display the Country in the Nudge, unless you use the IP Address field |
| IP Address | The ip address of the user, to show the location in case City/State/Country are not available | We do not display the user's location in the Nudge, unless you use the City/State/Country fields |
Data Type: Reviews
| Data field | Description | Impact if missing |
|---|---|---|
| Date | The date we use to show in the Nudge how long ago the sign-up took place | We use the moment the sign-up came through to Nudgify via the webhook as the "fallback" date |
| Rating | The number of stars of the review, to show in the Nudge | Required! Without the rating, we can't show the reviews in Nudges. |
| Name of Reviewer | The name of the reviewer, to show in the Nudge | We do not display the reviewer's name in the Nudge |
| Image of Reviewer | The image of the reviewer, to show in the Nudge | We display a star icon in the Nudge instead of an image of the reviewer |
| Review Title | The title of the review, to show in bold in the Nudge | We do not display a review title in the Nudge, just the main review text |
| Language | Language of the review | We try to only display reviews in the language you selected for your Nudges. If this is missing, we display reviews in any language |
| Review Text | The text of the review itself, to show in the Nudge | We do not display a review text in the Nudge |