Turn Sales, Sign-ups, and Reviews from any app into Social Proof
You may have seen “webhooks” mentioned in apps you use, and wondered what they are and if you should use them. The answer is, probably, yes. Webhooks are a way in which apps send information to other apps.
In Nudgify, we have a Smart Webhooks feature which makes it extra easy to send information from other apps to Nudgify. You can then show this information in Purchase Nudges, Sign-ups Nudges, or Review Nudges.
What are Webhooks?
There are two ways in which apps can communicate with each other: via something called “polling” and via webhooks. With polling, you actively need to keep checking if something new has happened yet. With webhooks, you get notified automatically when something new happens.
Simply put, polling is you actively asking your colleague for updates every day. Some days they have an update for you, other times, you ask but they have nothing new to report. Webhooks is automatically receiving an update from your colleague every time they have something new to share. You don’t have to ask.
An app that gives updates to another app via a webhook, has, as it were, that apps “phone number”. That is how it knows where to send the updates to. This “phone number” is a URL, also called a “Webhook URL”, or “endpoint”.
Webhooks are incredibly useful for a lot of different scenarios, and as such, a lot of apps support webhooks. This is great, because it allows all these apps to communicate easily with Nudgify!
For apps, supporting webhooks is like owning a phone. If I own a phone, and you own a phone, we can communicate! All you need in order to call me, is my phone number! Similarly, if Nudgify supports webhooks, any app that also supports webhooks can “call” Nudgify. All you need to do, is give Nudgify’s “phone number” (Webhook URL) to the app you’d like to connect to Nudgify.
What are Smart Webhooks in Nudgify?
When you use Nudgify, you can use webhooks to notify Nudgify every time something happens in another app that you use. For example, every time you have a new purchase in ClickFunnels, or someone submits a JotForm, or you receive a new review via Stamped.io. Via webhooks, you can show this information in your Social Proof Nudges.
Nudgify’s Smart Webhooks feature makes it extra easy to set up a webhook connection and show the information you want in your Social Proof Nudges. In this article, you read how you can use Smart Webhooks to connect your data to your Purchase Nudges, Sign-ups Nudges, and Review Nudges.
Which apps can I connect via Smart Webhooks?
Smart Webhooks allow you to connect data from any app to Nudgify. The only requirement is that the app you want to connect supports webhooks. A lot of apps do not only support webhooks, but also offer a simple, code-free way to add a webhook. A simple Google search of “webhooks” + “app name” will tell you quickly if the app you’d like to connect supports webhooks. If it does, you probably find the relevant webhook instructions as one of the first hits in the search results.
To make it even easier, we have created specific instructions on how to set up a Smart Webhook with these popular apps:
Choose one of our Smart Webhook Suggestions
You can also scroll down the integrations tab and find a list of popular apps that we know support webhooks. These are partly preconfigured Smart Webhook suggestions. To use one of them, click the “Use this Smart Webhook” button.
When you use any of these suggestions, the data type and webhook name are pre-set already. We offer pre-set Smart Webhook suggestions for the following apps:
- ClickFunnels (purchases and sign-ups)
- Drip (sign-ups)
- ECWID (purchases)
- EKM (purchases)
- Feefo (reviews)
- GetResponse (sign-ups)
- Gumroad (purchases)
- Instapage (sign-ups)
- Intercom (sign-ups)
- Kajabi (purchases and sign-ups)
- Landingi (sign-ups)
- Lightspeed (purchases)
- Patreon (purchases and sign-ups)
- Razorpay (purchases)
- Reviews.io (reviews)
- SendOwl (sign-ups)
- Squarespace (purchases)
- Stamped.io (reviews)
- Teachable (purchases and sign-ups)
- Thinkific (purchases and sign-ups)
- ThriveCart (purchases)
- TypeForm (sign-ups)
- Unbounce (sign-ups)
- Webflow (sign-ups)
To configure any of the Smart Webhook suggestions, follow the instructions in steps 3 – 7 below.
How do I create a Smart Webhook?
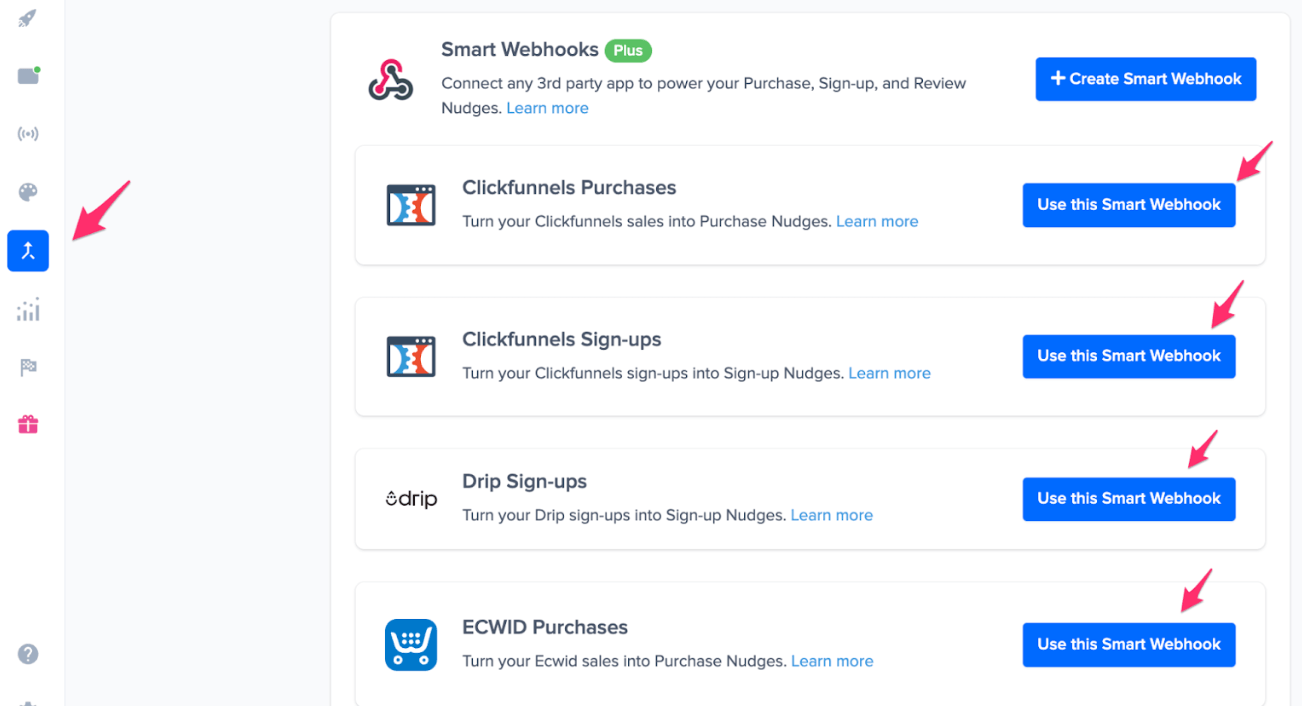
To create a new Smart Webhook, navigate to the Integrations tab via the left side menu. Scroll down and click on “Create Smart Webhook”.
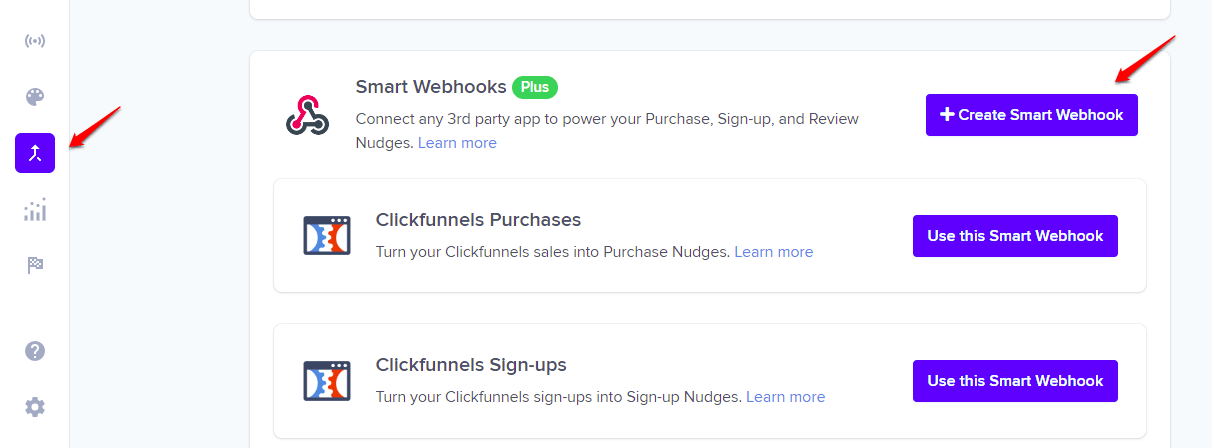
You can also choose from the list of Smart Webhook suggestions. Click the “Use this Smart Webhook” button next to the Smart Webhook suggestion of your choice. For these suggestions, the data type (purchase/sign-up/review) and the name of the Smart Webhook are predefined. This means you can skip steps 1 and 2 (below) and then go straight to step 3.
If the app you are looking for is not in the list of Smart Webhook suggestions, just click the “Create Smart Webhook” button, and follow steps 1-7 below.
Step 1: Select data type
Select the data type you’d like to connect. Is it data you want to show in Purchase Nudges, Sign-up Nudges, or Review Nudges? If you have chosen one of our Smart Webhook suggestions, you can skip this step and move to step 3.

Step 2: Name your Smart Webhook
Give your Smart Webhook a name. We recommend naming it after the app that you are connecting, e.g. “ClickFunnel Sign-ups”. If you have chosen one of our Smart Webhook suggestions, you can skip this step and move to step 3.
Step 3: Copy and paste your Webhook URL
You now see the unique Webhook URL for the Smart Webhook you’re creating. You can compare this Nudgify Webhook URL to a “phone number”, something that you’ll need to give to the app you want to connect to Nudgify. This way, your other app will know to send the updates (e.g. new orders, sign-ups, etc) to Nudgify. You need to copy this Webhook URL and paste it into the right place in the app you want to connect to Nudgify.
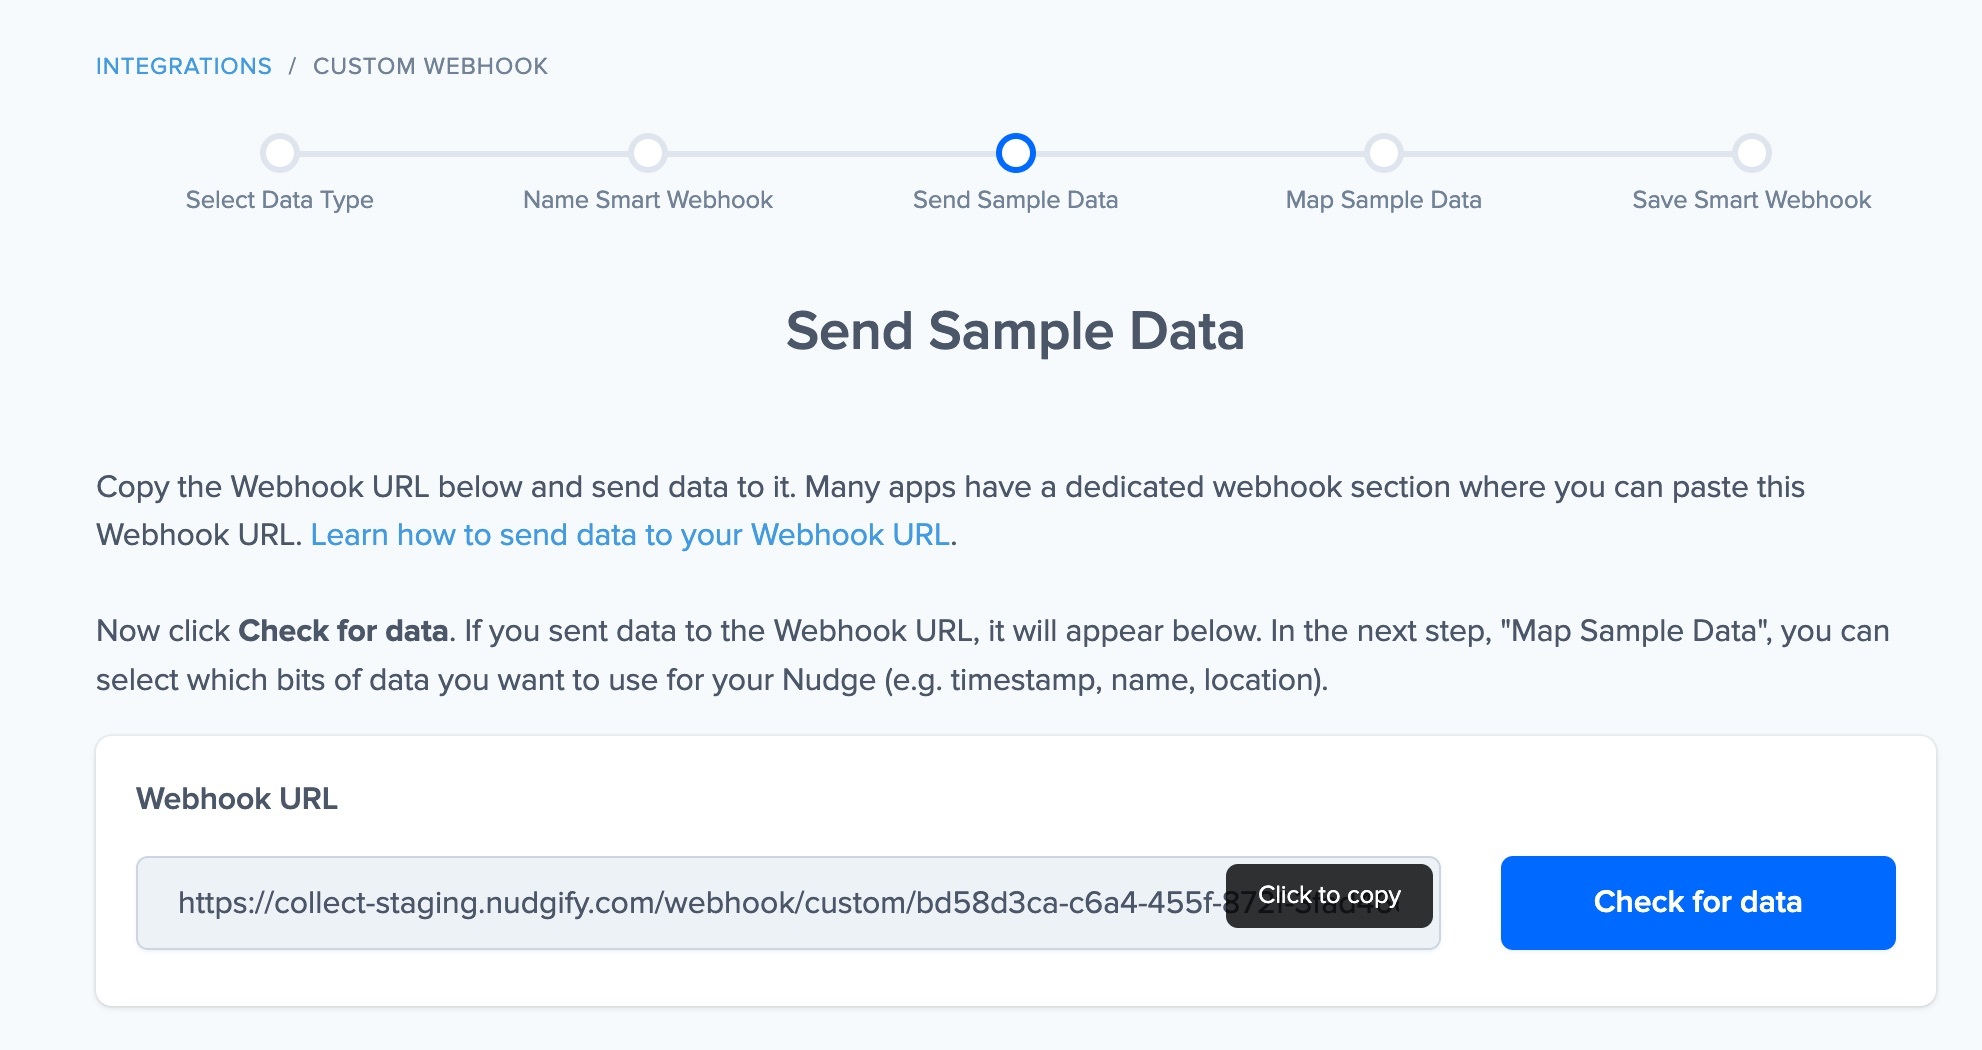
Where exactly you need to paste your Webhook URL is different for each app you want to connect. The best way to find out what to do with the Webhook URL you just copied, is to Google “webhooks” + “app name”. This should present you with the webhook instructions for the app you’re connecting. For many apps, this will look something like this example from Webflow:

- You can select the type of event your app should update Nudgify about, in this example “Form submission”
- You have a field where you can paste the Nudgify Webhook URL
This way, every time a new Form submission comes through, Webflow will tell Nudgify about it and send some relevant data (such as the name of the person who submitted the form and when it was submitted).
To make it easier, you can find links to relevant webhook instructions for some popular apps:
- ClickFunnels
- Drip
- ECWID
- EKM
- GetResponse
- Gumroad
- Instapage
- Intercom
- Kajabi
- Landingi
- Lightspeed
- Patreon
- Razorpay
- Reviews.io
- SendOwl
- Squarespace
- Stamped.io
- Teachable
- Thinkific
- ThriveCart
- TypeForm
- Unbounce
- Webflow
Step 4: Send sample data to your Webhook
Now that your Smart Webhook URL has been saved, your app has Nudgify’s “phone number” and knows what type of updates Nudgify is interested in.
Now, it’s time to send a test update to Nudgify via the webhook, and see what information comes through in the update. This is an important step in the process of setting up your Smart Webhook because it lets you “map” which information you want to show in the Nudge.
Depending on the type of event it is (a new order, a sign-up, a review), different data can come through via the webhook, such as the name of the customer, the name of the product they purchased, the number of stars in the review, etc.
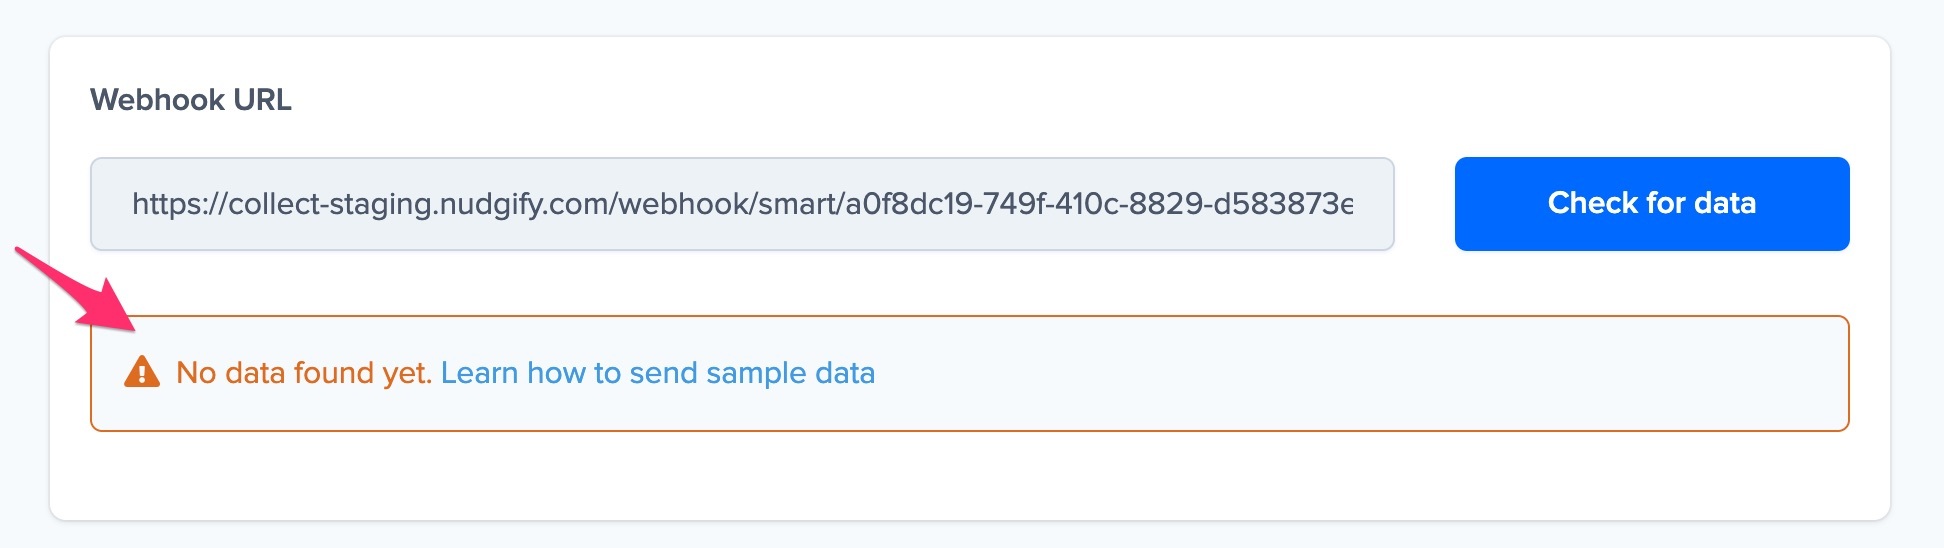
You can send sample data to your webhook by triggering the event that you selected for your webhook. If this is a form submission, to a test submission of your form. If this is a new purchase, place a test order. Once you’ve triggered this event, click the Check for data button in Nudgify. If you’ve indeed triggered the right event, the update including the relevant information was sent to your Smart Webhook in Nudgify and the data will appear below your Webhook URL.
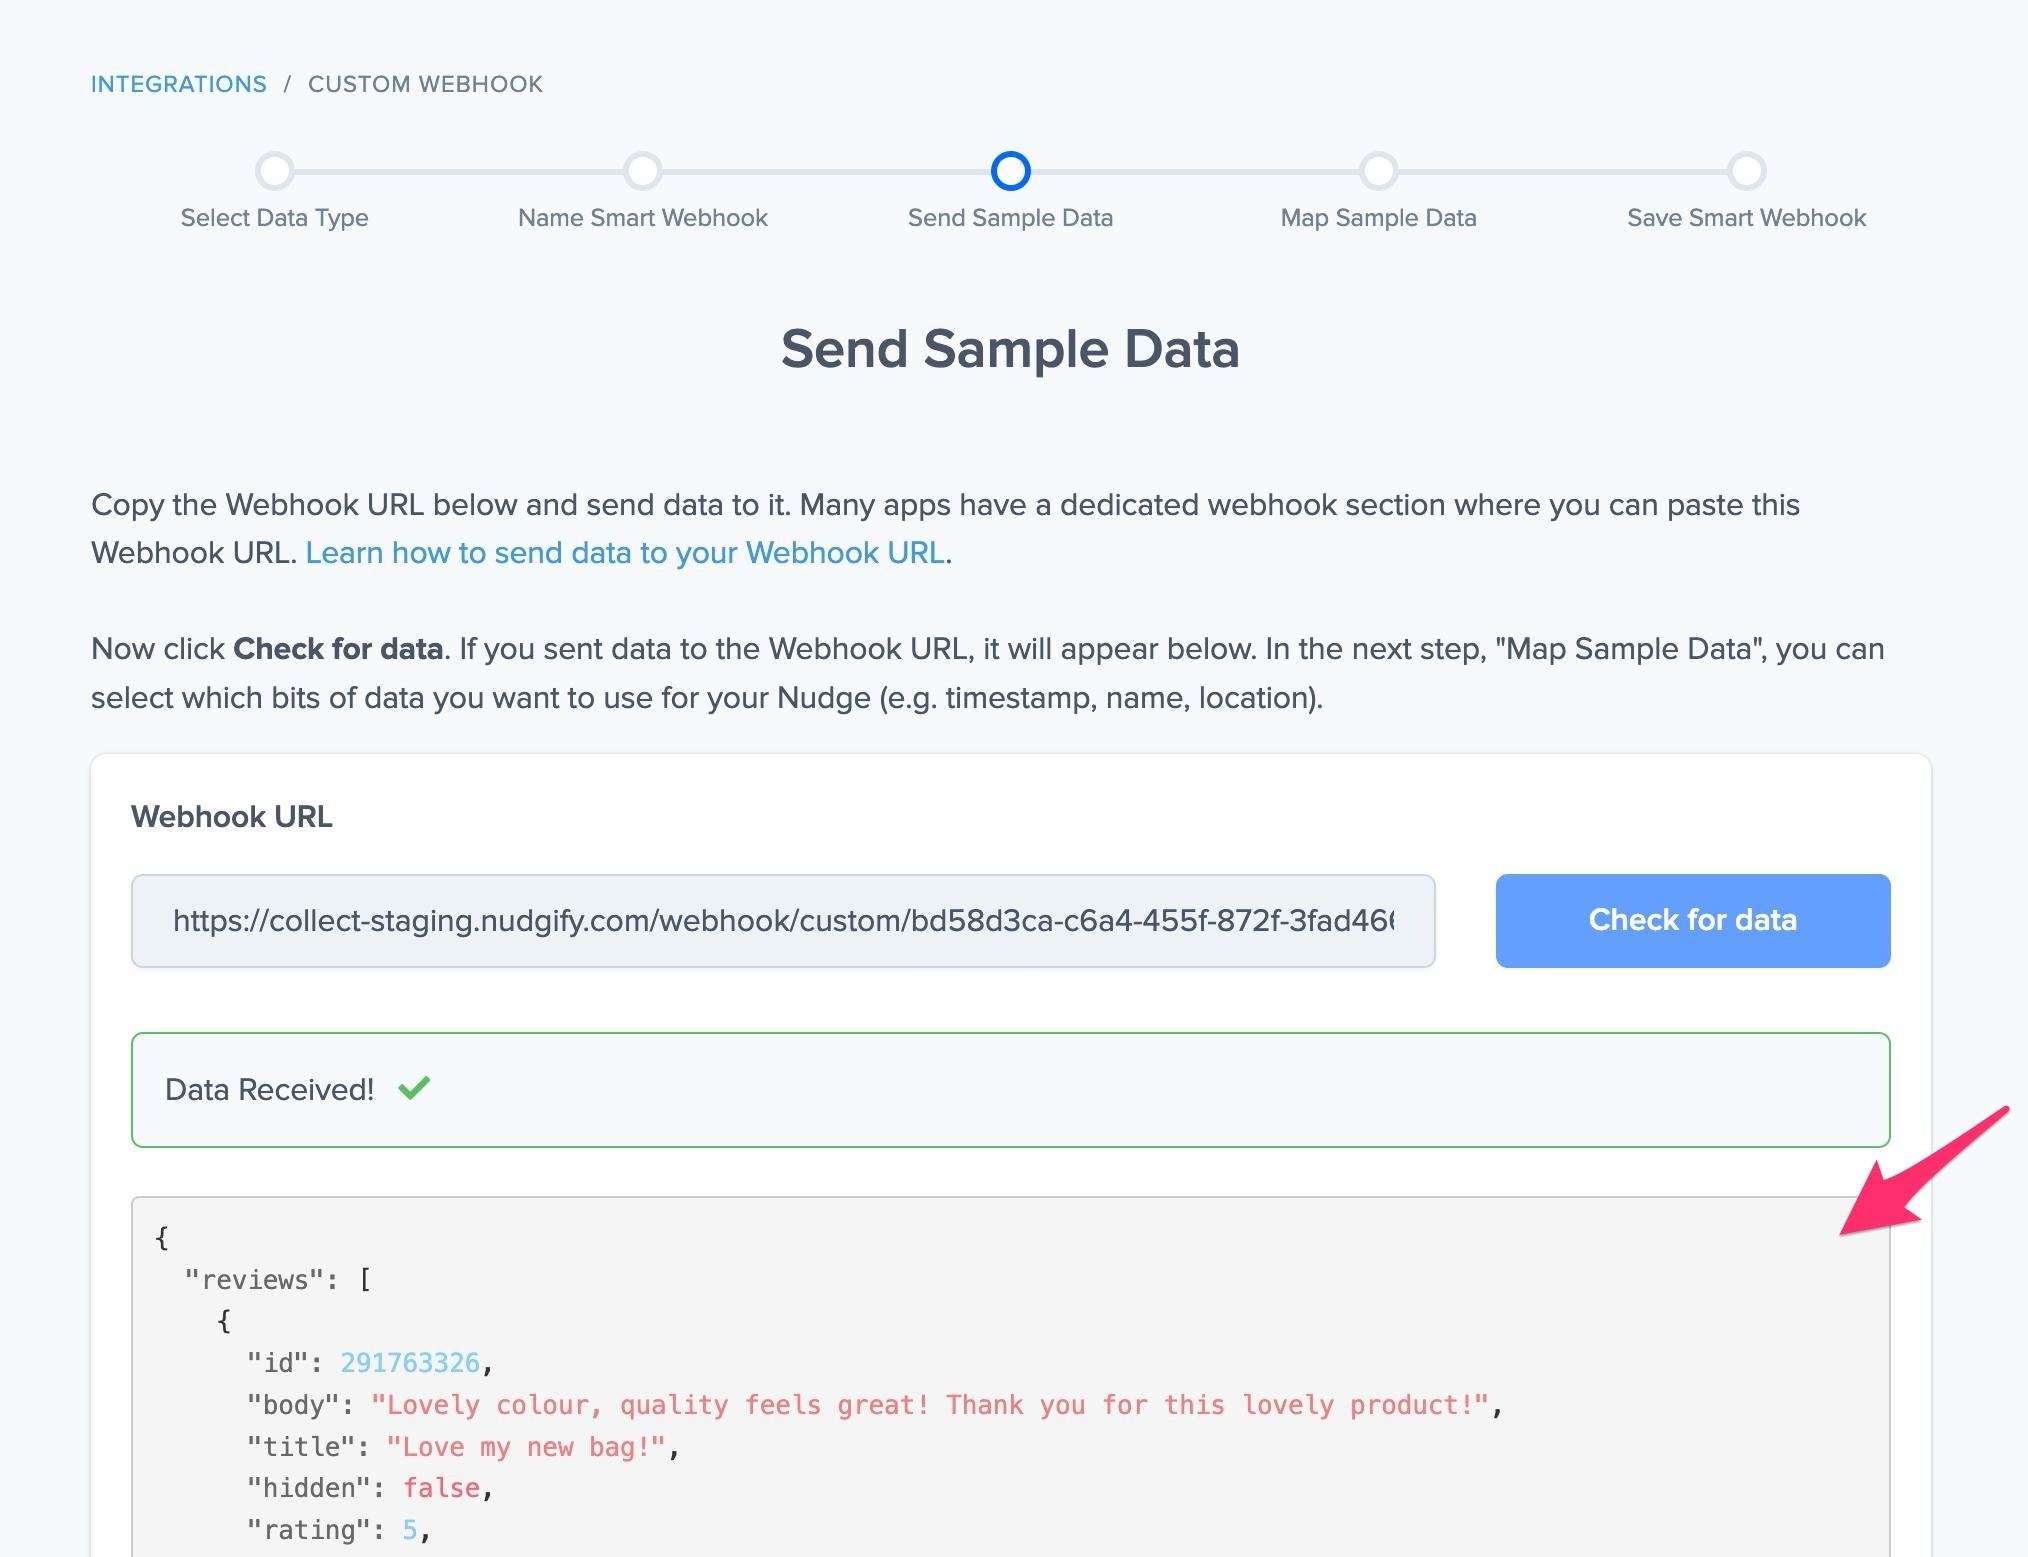
If no data was found, this means that you haven’t triggered the right event, or you have not set up the Webhook URL for that event. You can double-check and adjust your set-up, and then click Check for data again.
Step 5: Map your sample data
In this step, you tell Nudgify which pieces of data to use in your Nudge. Which bit of sample data is the customer name? Which bit is the name of the product they purchased? And so on. You use the drop-downs to select the right bit of sample data for each field.
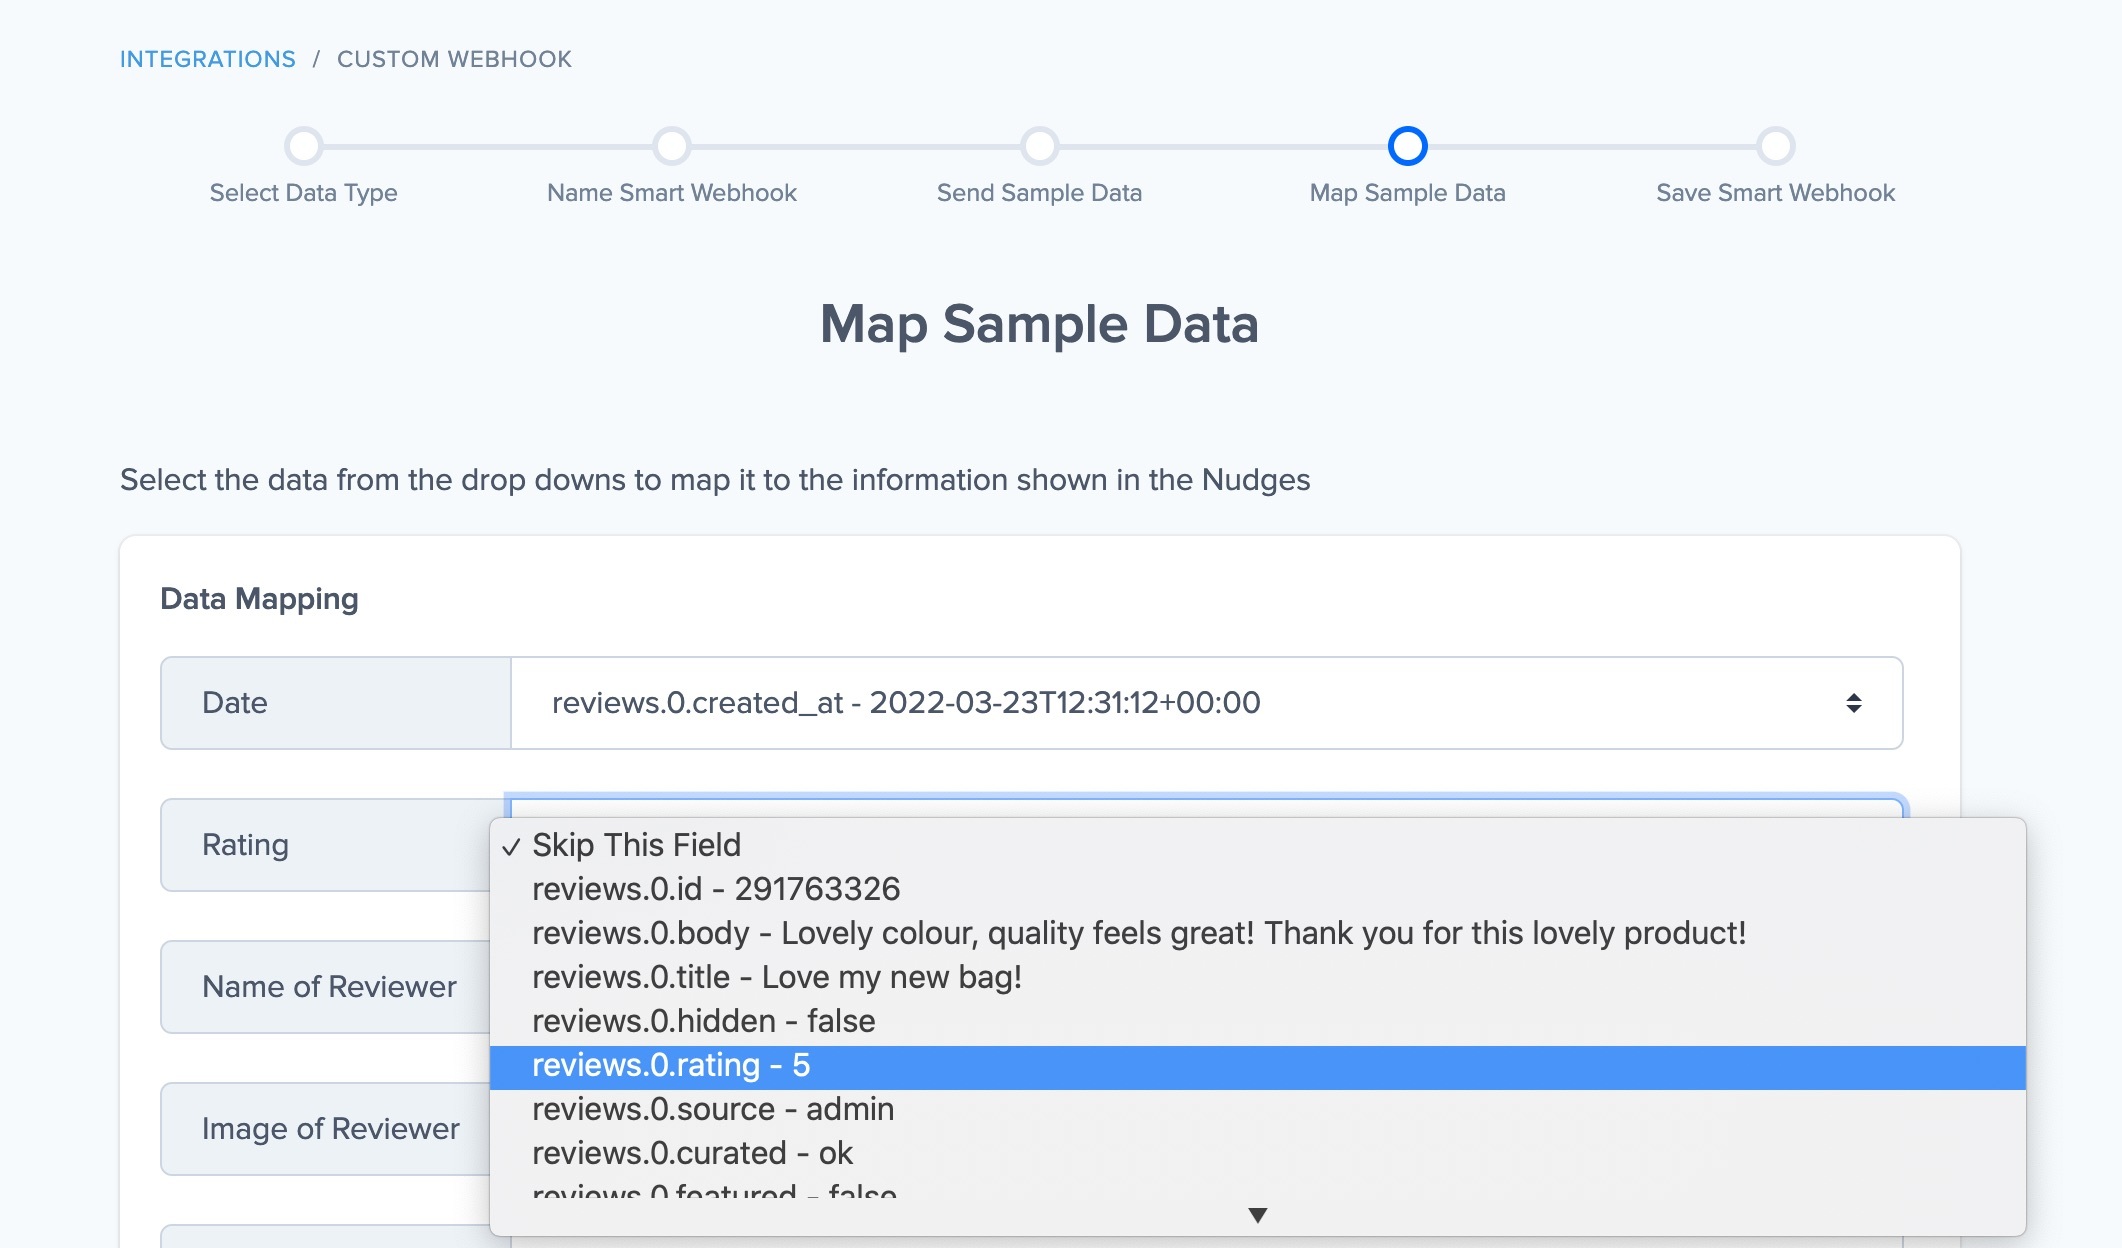
Mapping the data is something you do one time. Once you have “mapped” the sample data for your Smart Webhook, any new purchases/sign-ups/reviews that this webhook sends to Nudgify will show the correct bits of data in the correct places of the Nudge.
Note: Nudges can only display data that is sent by the third-party app you connect via the webhook. If the app you connect does not provide e.g. the location of the customer, then Nudgify won’t be able to display the location in a Nudge.
Step 6: Save your Smart Webhook
In this last step, you see an overview of your Smart Webhook: the name of your Smart Webhook, its data type, the Webhook URL, and your data mapping.
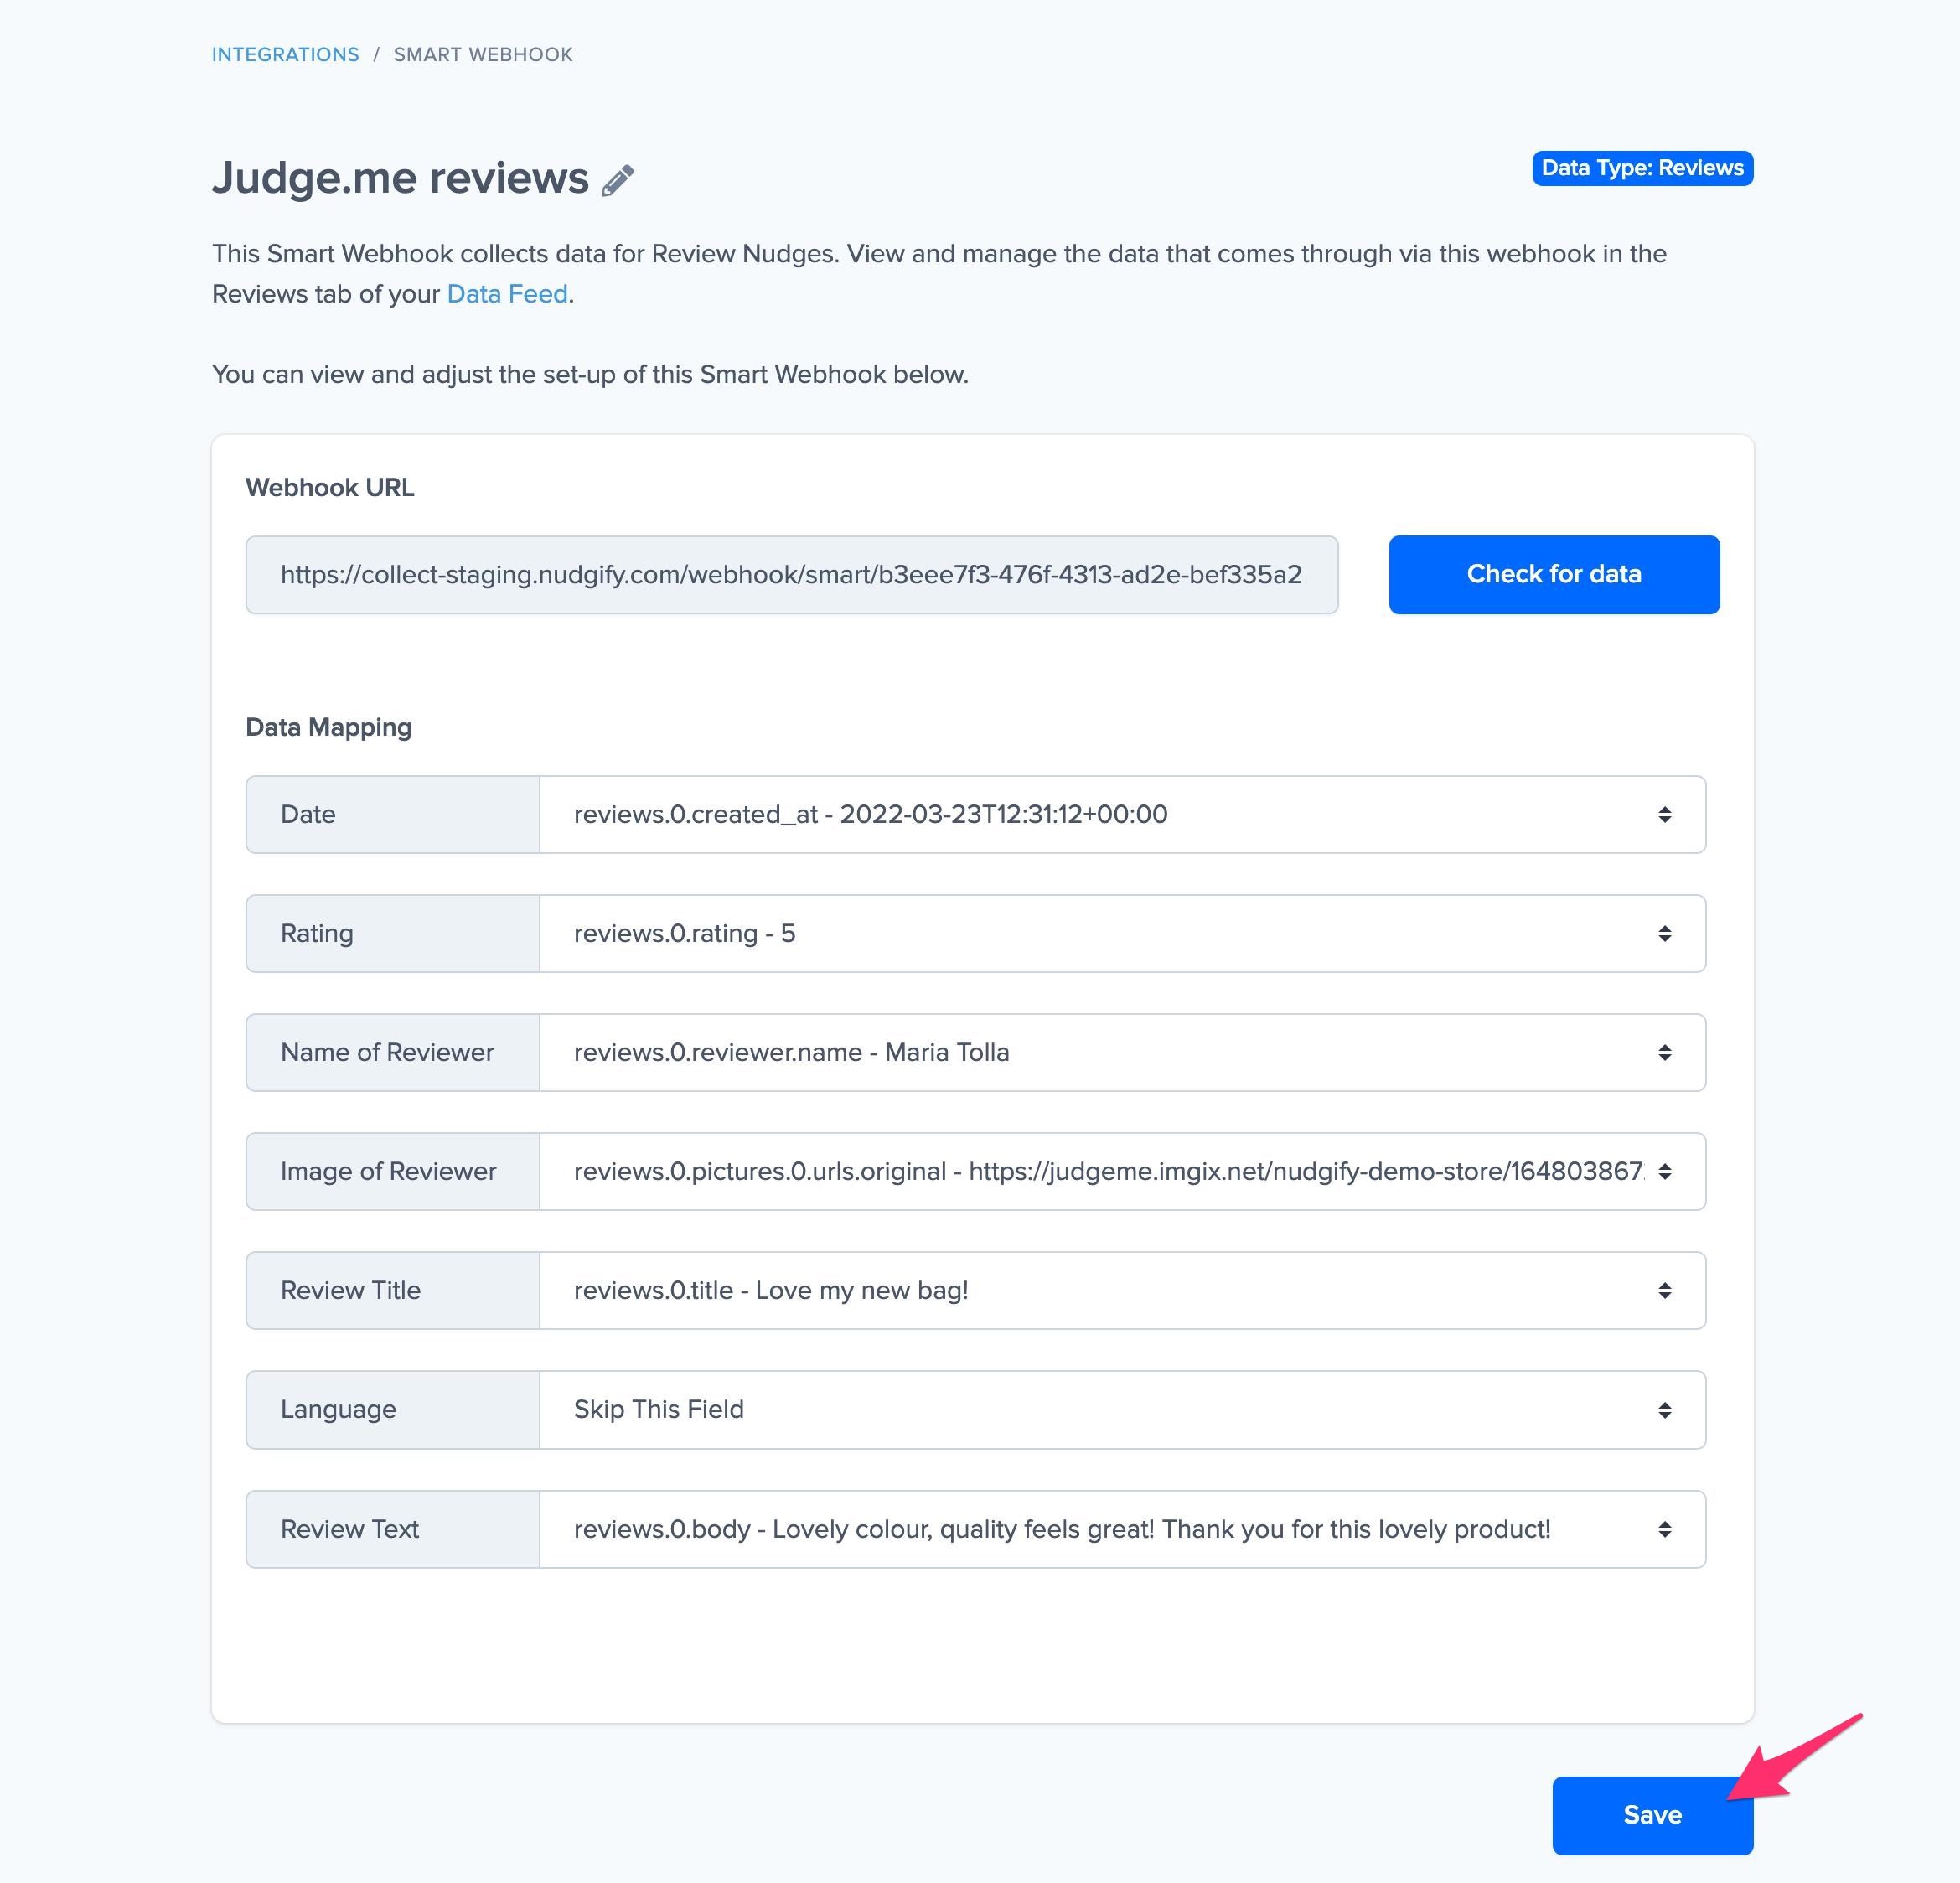
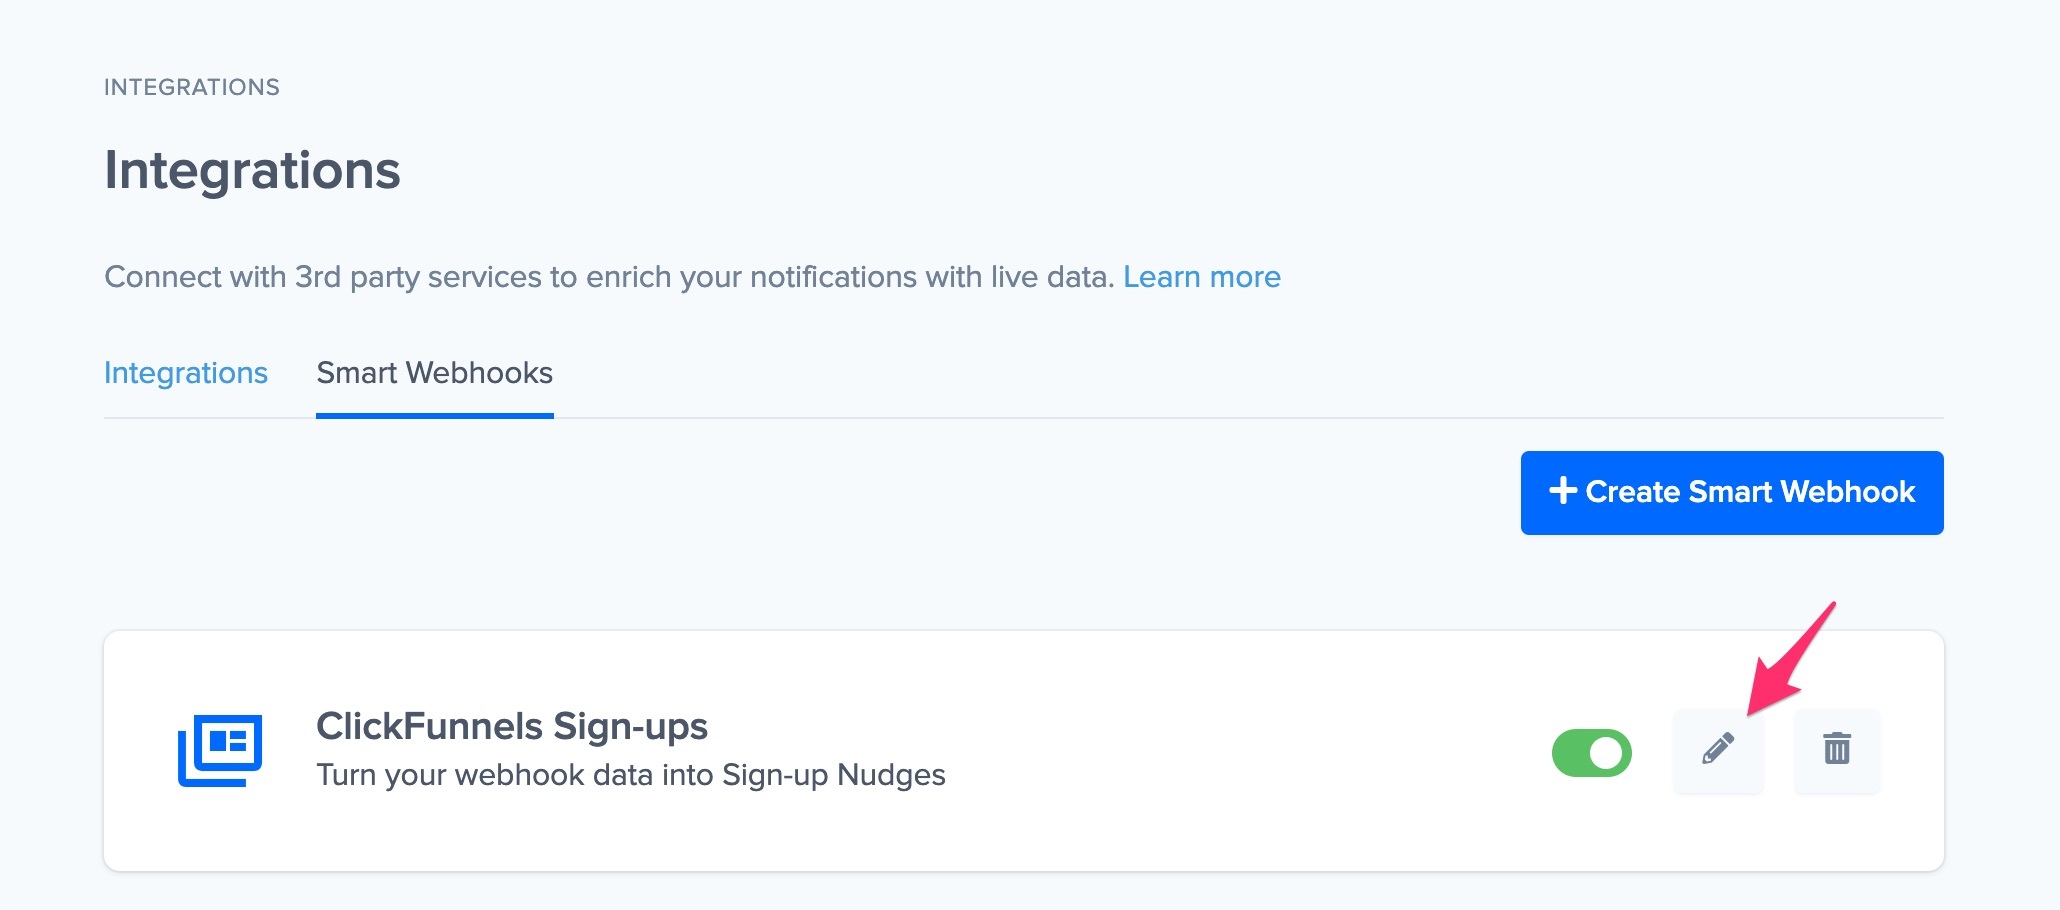
To save your webhook, click “Save”. You can always return to this overview and make changes to the set-up of this Smart Webhook by clicking the pencil icon on the Smart Webhooks page.
That’s it! You’ve created your Smart Webhook!
Step 7: Show your Smart Webhooks data in Social Proof Nudges
Congratulations, you have created a Smart Webhook! On your Data Feeds page, you can see the data that is connected to Nudgify via your Smart Webhook in the relevant Data Feed tab (Purchases, Sign-ups, or Reviews).
You can now display this data in Purchase, Sign-up, and Review Nudges respectively, by selecting your Smart Webhook as the data source when you set up the Nudge. For example, if you created a Smart Webhook for Purchases, this Smart Webhook now appears in the dropdown among the Data Sources you can select for this Nudge.
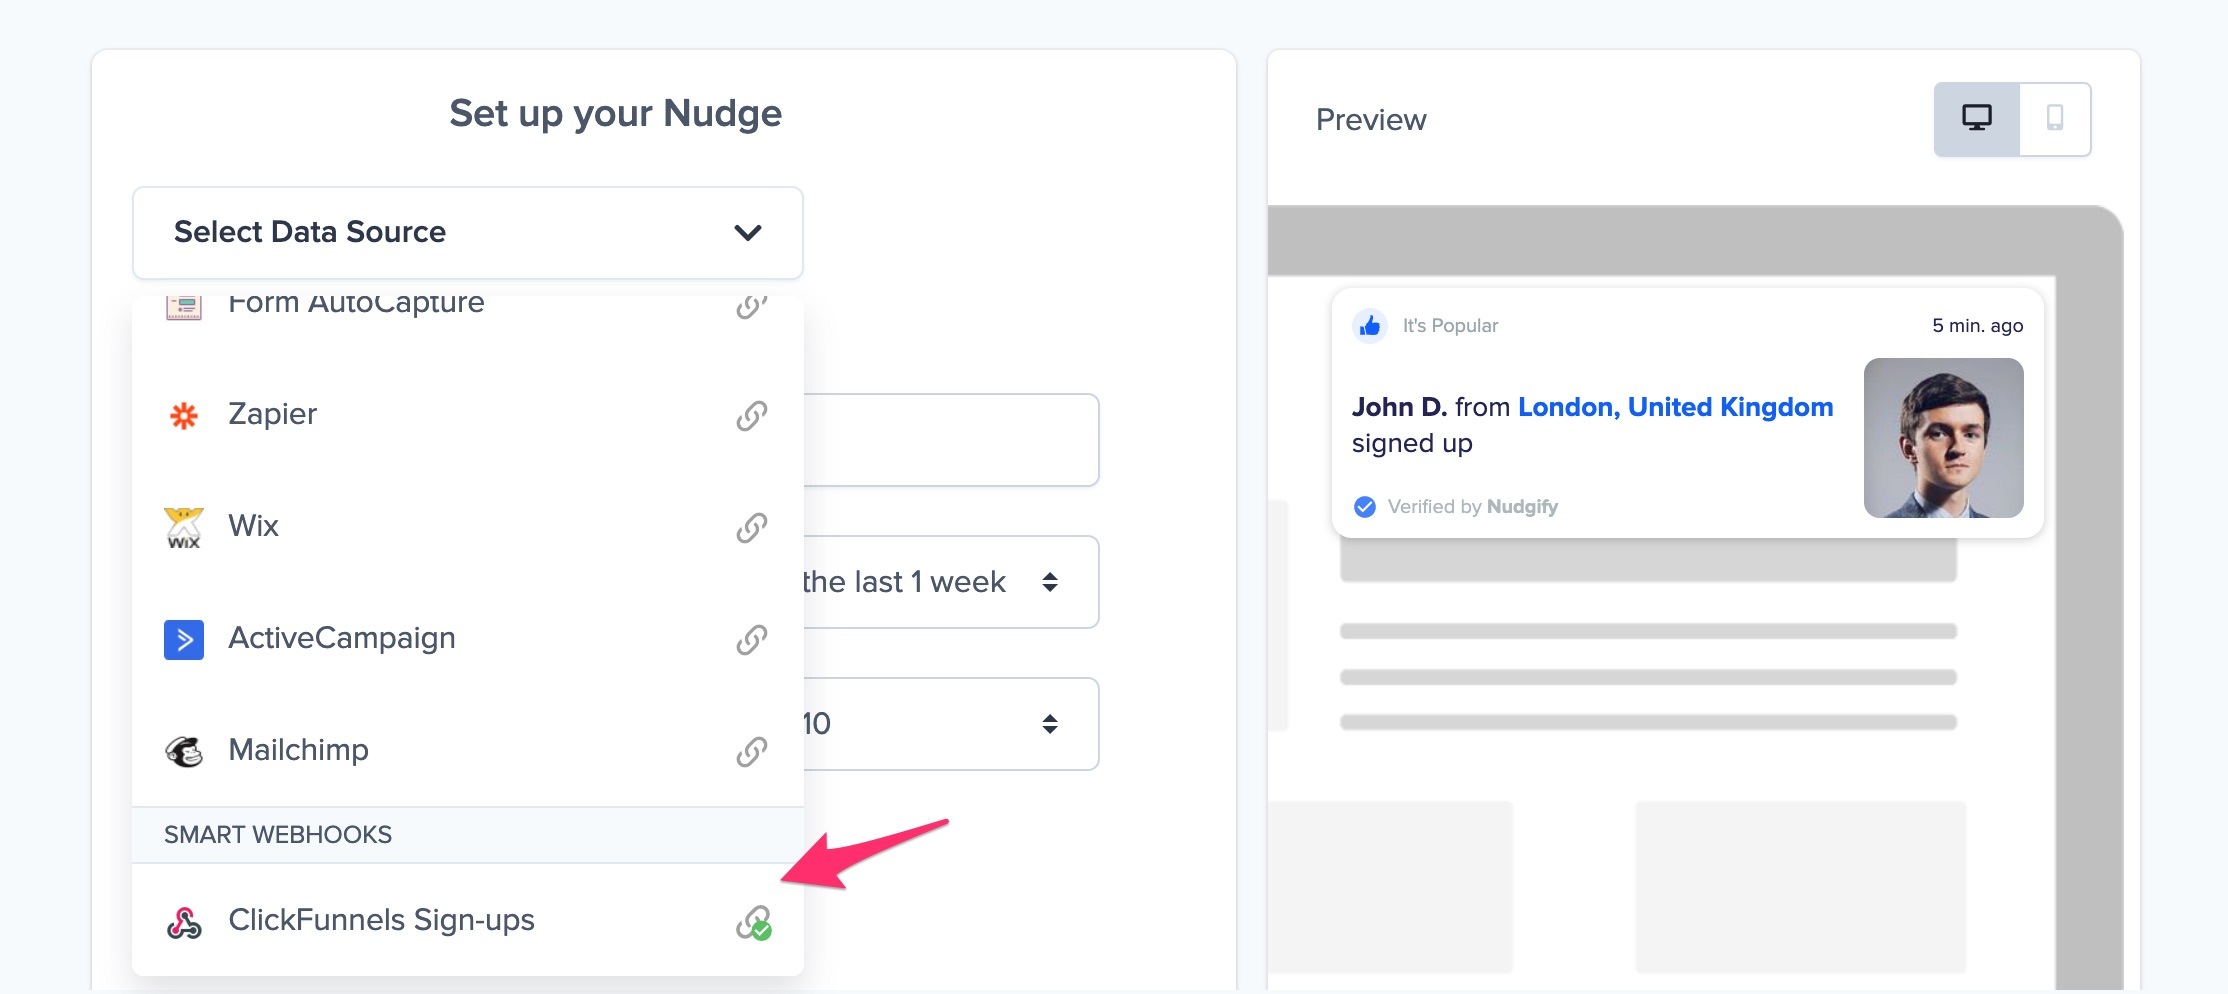
When you select it as the data source, the Nudge will display the data that comes through to Nudgify via your Smart Webhook.
What if not all the bits of data are there?
Smart Webhooks allow you to connect any third-party app that also supports webhooks. Every app will handle webhooks slightly differently and send different bits of data along with the webhook. For example, some apps might send the First Name and Last Name of the person who signed up, other apps might send the Full Name. Some apps might not send a name at all.
As a general rule, Nudgify is not able to show any data that is not there. So if the third-party app does not send the customer name along via the webhook, then we are unfortunately not able to display the customer name in the Nudge. Below, you find an overview of the impact of different bits of data are missing:
Data Type: Purchases
| Data field | Description | Impact if missing |
|---|---|---|
| Date | The date we use to show in the Nudge how long ago the purchase took place | We use the moment the order came through to Nudgify via the webhook as the "fallback" date |
| The email address of the user to identify that there has been a new purchase | Required! We use the email address as identifier. Without the email, we can't show the purchase in Nudges | |
| Order ID | The order-id we use to identify which items are part of the same order | Required! Without the Order ID, we can't show the purchase in Nudges |
| First Name | The first name of the customer, to show in the Nudge | We do not display the customer name in the Nudge, unless you use the "Full Name" field |
| Last Name | The last name of the customer, to show in the Nudge (we only show the initial of the last name) | We do not display the customer name in the Nudge, unless you use the Full Name field |
| Full Name | The name of the customer, to show in the Nudge | We do not display the customer name in the Nudge, unless you use the First + Last Name fields |
| City | The city of the customer, which we show in the Nudge | We do not display the City in the Nudge, unless you use the IP Address field |
| State | The state of the customer, which we show in the Nudge (for US) | We do not display the State in the Nudge, unless you use the IP Address field |
| Country | The country of the customer, which we show in the Nudge (note for the US we use State instead) | We do not display the Country in the Nudge, unless you use the IP Address field |
| IP Address | The ip address of the customer, to show the location in case City/State/Country are not available | We do not display the customer's location in the Nudge, unless you use the City/State/Country fields |
| Product ID | The id we use to identify the product that was ordered | We do not display any product information |
| Product Variation ID | The id we use to identify the variation (colour, size etc.) of the product that was ordered | We do not take into account different variants of the product |
| Product Name | The name of the product that was ordered, to show in the Nudge | We do not display the product name in the Nudge |
| Product Page Link | The product page that we link to from the item name in the Nudge | We do not link to the product page from the product name in the Nudge |
| Product Image URL | The product image that we show in the Nudge | We do not display the product image in the Nudge |
Data Type: Sign-ups
| Data field | Description | Impact if missing |
|---|---|---|
| Date | The date we use to show in the Nudge how long ago the sign-up took place | We use the moment the sign-up came through to Nudgify via the webhook as the "fallback" date |
| The email address of the user to identify that there has been a new sign-up | Required! We use the email address as identifier. Without the email, we can't show the sign-ups in Nudges | |
| First Name | The first name of the user, to show in the Nudge | We do not display the user's name in the Nudge, unless you use the "Full Name" field |
| Last Name | The last name of the user, to show in the Nudge (we only show the initial of the last name) | We do not display the user's name in the Nudge, unless you use the Full Name field |
| Full Name | The name of the user, to show in the Nudge | We do not display the user's name in the Nudge, unless you use the First + Last Name fields |
| City | The city of the user, which we show in the Nudge | We do not display the City in the Nudge, unless you use the IP Address field |
| State | The state of the user, which we show in the Nudge (for US) | We do not display the State in the Nudge, unless you use the IP Address field |
| Country | The country of the user, which we show in the Nudge (note for the US we use State instead) | We do not display the Country in the Nudge, unless you use the IP Address field |
| IP Address | The ip address of the user, to show the location in case City/State/Country are not available | We do not display the user's location in the Nudge, unless you use the City/State/Country fields |
Data Type: Reviews
| Data field | Description | Impact if missing |
|---|---|---|
| Date | The date we use to show in the Nudge how long ago the sign-up took place | We use the moment the sign-up came through to Nudgify via the webhook as the "fallback" date |
| Rating | The number of stars of the review, to show in the Nudge | Required! Without the rating, we can't show the reviews in Nudges. |
| Name of Reviewer | The name of the reviewer, to show in the Nudge | We do not display the reviewer's name in the Nudge |
| Image of Reviewer | The image of the reviewer, to show in the Nudge | We display a star icon in the Nudge instead of an image of the reviewer |
| Review Title | The title of the review, to show in bold in the Nudge | We do not display a review title in the Nudge, just the main review text |
| Language | Language of the review | We try to only display reviews in the language you selected for your Nudges. If this is missing, we display reviews in any language |
| Review Text | The text of the review itself, to show in the Nudge | We do not display a review text in the Nudge |